Wednesday, 28 October 2015

FS Clipboard – JAWS - MAGic

Using the FS Clipboard - JAWS - MAGic

If you use any kind of AT software you’ll be well aware of some of the additional tricks that you can pull off to make your daily digital life that little bit easier. One of those little helpers is the FS Clipboard feature, available in both the JAWS screenreader and also MAGic, the magnification and speech software also produced by Freedom Scientific.

FS Clipboard adds a bit of spin to the normal Windows clipboard as you append rather than replace any existing content. Normally, when you select some text and use CONTROL C to copy to the clipboard, what you are copying replaces the current contents of the Windows clipboard. However, with the JAWS and MAGic FS Clipboard feature, every time you copy you add to the existing contents as opposed to replace them. Let’s go through an example.

Appending Content in the FS Clipboard

In this example, we’re going to create a list of reference numbers and then copy some of those numbers to the FS clipboard for pasting in later in a new location. I should add that if you are running JAWS or MAGic the steps are identical.

  1. Open a new document in MS Word or equivalent.
  2. Type in a few lines of data, something like ten should be enough. I’ve chosen to create some short references, like this: A1001, A1002, A1003 and so on.
  3. Now, move to the top of the list with CONTROL HOME and select the first reference number using SHIFT with the ARROW KEYS.
  4. Remember you can repeat what is currently selected using INSERT SHIFT DOWN ARROW in JAWS and MAGic. (With MAGic you may also use the MAGic key of CAPSLOCK instead of INSERT.) Additionally, if you are using JAWS, you can use INSERT SHIFT DOWN ARROW twice quickly to have your selection spoken character by character.
  5. With the content selected and checked, instead of using the standard Windows keystroke of CONTROL C, use INSERT WINDOWS C to copy instead.
  6. Move the cursor in your list now and choose one of the other reference numbers. Select it as before and copy to the FS Clipboard with INSERT WINDOWS C. Repeat this step another couple of times.
  7. With a few entries now in the FS Clipboard, let’s check the content. Use INSERT SPACEBAR, then tap letter C (MAGic users can also use CAPSLOCK SPACEBAR instead). A virtual viewer will open and from there you can read all the text you have copied. When you have finished checking the content, use ESCAPE to close the viewer.
  8. Now move the cursor to a new position and paste in the FS Clipboard contents using CONTROL V. Check that everything is as you expect it to be – you’re done.

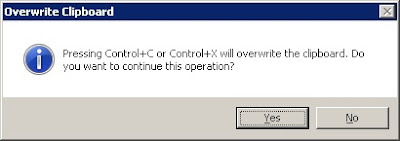
A neat finishing touch to this FS Clipboard feature is that if you accidentally use CONTROL C instead when you are copying your data, it doesn’t wipe the FS Clipboard content immediately. JAWS or MAGic will pop a warning message box up on screen indicating that if you continue you’re going to lose the content in the FS Clipboard contents. Very nice – because if there is one keystroke that everyone knows by instinct, it’s got to be CONTROL C!

This is an image of the warning message that appears if you accidentally use control C when using the FS Clipboard. There's a Yes button, to continue and lose the contents of the FS Clipboard. Alternatively, there is a No button to cancel.

The FS Clipboard is a useful tool that has been around for a while, so if you are using JAWS or MAGic and are often faced with moving non-contiguous data from one location to another, this is an option worth adding to the toolbox if you haven’t already.

Until next time, have fun!
Wednesday, 21 October 2015

Freeze Window - Zoomtext V10

Freezing a Window in Zoomtext V10

If you’ve been wondering why things have been a bit quiet round here the last few weeks it’s because I’ve been busy moving house – which is always good fun, if not always for the right reasons. Now that the dust has settled somewhat and I’m a bit more comfortable living in the remaining boxes with a paint brush in one hand, it’s time to get back to blog business.

A reader of this blog asked me recently whether the blog “is all about JAWS?” Although I indicated otherwise, upon reflection there is a fairly JAWS heavy feel to it so it’s about time I balanced things out a bit more and spread a little more love to my non-JAWS using readers. And what better way to do this than with a walkthrough of that much under-used Zoomtext function: Freeze Windows.

The Freeze Window feature works in full screen mode only and allows you to keep a section of the screen in focus while you navigate around the screen. In other words, you can drag over a bit of the Desktop and keep it in the zoom window while you are scrolling around looking at different parts of the screen. It works best with an area of the screen that is not likely to get obscured by an overlapping window and, with that in mind, let’s walk through a useful example.

Creating a New Freeze Window

Remember that this freeze window feature only works when you run Zoomtext in full screen mode. Notice that if you are in any other screen mode, such as Line or Lens or Overlay (by the way, who actually uses Overlay?) then the Freeze option will be greyed out.

Our example here is going to set a freeze window around the 24 hour clock in the system tray area at the bottom right hand corner of your Desktop. Setting a freeze window around the clock means that you can always see the time no matter what you are working in. Let’s get started:

  1. With Zoomtext running, ensure that you are in full screen mode by activating the Type menu button on the Magnifier toolbar and choosing Full from the list if it is not already ticked.
  2. Return to the Type menu and choose New from the Freeze submenu.
  3. Image showing the Freeze submenu in the Zoom Window type toolbar in Zoomtext V10.
  4. Notice a small icon now following the mouse pointer. Move the mouse pointer down to the bottom right of your Desktop – position the arrow so that the tip of the mouse pointer is at the bottom right of the time display.
  5. Now hold the left mouse button down and drag diagonally to the top left corner of the time display. Notice how a small reverse video box will cover the area you are "dragging" over. This area will be your freeze window.
  6. When you are happy that the window is right, let go of the left hand mouse button.
  7. Notice some white drag handles have appeared around the border of the freeze window area, you can use these as necessary to make slight adjustments to the frozen window area. Left click and drag to move them as necessary.
  8. After making any sizing adjustments, position your mouse pointer over the area you have just "frozen", hold the left mouse button down and drag the whole frozen window to another position on the screen. For example, some people like having their time display freeze window situated in the top right corner of the screen so that it doesn’t get in the way when you are working.
  9. NOTE: It may take a few tries to get used to this, so if you need to start again just go back to the Freeze submenu and choose New to restart.

  10. With the resizing and repositioning done, confirm everything using a single tap of the right hand mouse button.
  11. With your new freeze window on screen, you can use the enable and disable freeze window keystroke of CONTROL SHIFT E to control the feature.

Okay, the freeze window feature is hardly going to change the world but, for specific things, it is well worth experimenting with if you are in full screen mode most or all of the time. And if you discover some great new uses for this feature then please let me know so that we can share with other readers. Until next time, have fun!