Tuesday, 13 December 2016

Setting Reading Zones – Zoomtext V10 - MS Excel

Using Reading Zones in Zoomtext

While Zoomtext is generally known for its magnification abilities, the Magnification and Reader flavour has a number of speech tools that even low level mag users should explore. Features such as DocReader, AppReader and SpeakIt are always popular but one feature not quite so commonly spoken about is reading zones.

To better understand this feature you need to take onboard one of the more potentially frustrating aspects of magnification (any magnification software I might add, not just Zoomtext) which is that you can often spend a large amount of time "chasing the screen." What I mean by this is that, depending on how the information is laid out when magnified, you may have to be continually moving and adjusting and refocusing the main magnified window to keep making sense of the information area you are in.

Now, this is an unavoidable impact of screen mag for sure, but it's fair to say that after a few hours this does get pretty tiring. Therefore anything that can help to reduce the effect in certain circumstances has got to be worth exploring. This is where reading zones comes in, with this you can section off a piece of screen and then choose to have the content of that section either displayed or spoken (or both) using a keystroke. The point being of course, that you don't necessarily need to move away from where you are working now to read this other info, therefore minimising the screen movement to some extent.

This image displays the reader toolbar and all the main options, including the Zones button.

In this walkthrough, I'm going to demonstrate how you can set up a reading zone to read the content of the Excel formula bar. This is great when you are in a formula heavy worksheet as you can read the formula bar without having to continually refocus the zoom window all the time.

Creating a New Reading Zone to Speak the Content in the Excel Formula Bar

Note that for this walkthrough I am using Excel 2010 and Zoomtext V10.1:

  1. Open MS Excel and maximise the program window if it isn't already.
  2. Use the keystroke of ALT CONTROL Z to launch the new reading zone function directly. (If this doesn't work, go to the Zoomtext Reader toolbar and click Zones then New.)
  3. With the Reading Zone tool active you should have two small overlapping rectangles following your mouse pointer around the screen. If so, move to the top left corner of the formula bar area in Excel and drag the rectangular outline along the formula bar to the bottom right corner. Don't worry about getting this exact - it's okay to have a bit of the borders around the formula bar in your selection for example. However, try to avoid including text in your zone that doesn't have anything to do with the actual content you want to hear!
  4. With the right area selected under the rectangle, let go of the mouse button. The main Settings... reading zones dialog box will open. In here you can adjust the following:
    • Zone Name: For our example here, type "Formula".
    • Zone is relative to: Leave this set to "Top-left".
    • Zone Actions: Choose the "Speak text in zone" radio button.
    • Hotkey: Make a note of the specific trigger keystroke for the zone you have created.
  5. With the above options in place, TAB or click the OK button to confirm the creation of the new reading zone.

It's time to test the new zone out! Either create some test data in a new Excel workbook or open an existing workbook and trigger the speaking of the zone content using the appropriate keystroke - which will be ALT CONTROL 1 by default if this is the only zone you've ever created. When you use the trigger keystroke, the content of the reading zone should be spoken back to you.

If your reading zone is working fine and you find it useful then remember to save your application settings in the File menu. If you do not do this, Zoomtext won't store your zone information and it will be lost when you next unload the software or shut your PC down.

Note: You can have ten reading zones set up per application, with default keystrokes running from ALT CONTROL 1 to ALT CONTROL 0.

Editing Existing Reading Zones

Hopefully, the above example demonstrates the potential use of reading zones and has given you a bit of an incentive to experiment. Excel is actually a very good candidate for working with reading zones because it has distinct areas that can be mapped quite easily. Here's another couple of areas in Excel that you might want to consider wrapping up in a reading zone:

  • Status Bar: You can set a reading zone to speak the outputs of the SUM, AVERAGE, COUNT and other functions that are displayed in the status bar when selecting a range of cells.
  • Name Box: The name box sits to the left of the formula bar and displays any name assigned to a specific range of cells. Being able to read this might be useful if you are in a complex worksheet that uses a lot of different named ranges.

When you have a few reading zones in place for a specific application you can adjust each of them as necessary via the zones edit mode. Try it out:

  1. Move into the application that contains the zones you want to edit.
  2. Use the keystroke of ALT CONTROL E to move into a reading zone edit mode. Alternatively, you can click on the Zones button on the Reader toolbar and choose Edit.
  3. The screen will darken and the numbered zones you have set for the current application will be displayed on screen. Using your mouse, click on the particular zone you need to edit.
  4. With the specific reading zone in focus and active, familiar white drag handles will appear on each side of the zone rectangle. Use these drag handles to click and drag, changing the dimensions of the zone as required.
  5. To delete a reading zone entirely rather than edit, select the relevant zone while in edit mode and tap the DELETE key to remove it.
  6. When you have finished editing and/or deleting, RIGHT CLICK with the mouse to exit the current mode.
  7. To cancel edit mode without making any changes use the ESCAPE key.

Okay, that's it for now. Happy experimenting with reading zones and until next time, have fun!

Thursday, 8 December 2016

File Protected View - MS Word 2010 - JAWS - NVDA

Configuring Protected View Settings using Speech

Something that still crops up frequently is the frustration many speech users have when trying to open a Word document that has launched in Protected View. Often this will be when someone outside your organisation has sent an email with a few attachments and BANG! - on launching an attachment there's no speech because it's in Protected View - which is like a Read Only mode on steroids if you catch my drift.

But what's the problem here you might be thinking? After all Protected View is there to shield your PC from all manner of nasties lurking out there in cyberspace. Well, this is the case but the issue for anyone using speech is that, if you can't focus on the "enable editing" button (for whatever reason) then the screenreader can't hook into the document and read it. And, as you can probably imagine, that's not a great situation - especially when it's urgent documents you're expecting from a trusted source.

While it is technically possible to work your way to focus on the "Enable Editing" button this can be a bit hit and miss. As a result of this, what you might consider is turning the Protected View mode off in the first place. That way attachments can be launched in full editing mode and will be accessed and read as normal. (The flipside of course is that if there IS anything a bit untoward contained in the document data then you'd better hope your AV software is on the ball to quarantine and remove as required.)

So, if you are looking to reconfigure your Protected View settings, this is how you do it in Word 2010 using JAWS or NVDA:

  1. Open MS Word 2010.
  2. Use ALT F to open the File tab in the upper ribbon.
  3. DOWN ARROW all the way to Options and use SPACEBAR to activate.
  4. In the next list, DOWN ARROW until you have focus on Trust Centre then TAB until you have focus on the Trust Centre Settings... button. Use SPACEBAR to activate.
  5. In the Categories list box, make sure you have focus on the Protected View item then TAB over to a range of checkboxes. In order, you can:
    • Enable protected view for files originating from the Internet.
    • Enable protected view for files located in potentially unsafe locations (the "Temporary Internet Files" folder for example).
    • Enable protected view for Outlook attachments.
  6. Use TAB to move through the options and toggle each on and off using the SPACEBAR.
  7. When finished, TAB to OK and use SPACEBAR.
  8. Focus will move to the Trust Centre dialog box, so once more, TAB to OK and use SPACEBAR to return to your document.

Bear in mind that by turning protected view off you are essentially turning off an added layer of security, depending on your work or the kind of data you are accessing this may not be a wise move regardless of the frustration. However, in certain circumstances - particularly in a work setting - it may be easier to toggle the Outlook setting off temporarily than trying to enable the editing manually.

Have fun!

Friday, 14 October 2016

Column and Row Title Reading - MS Excel - JAWS V16

Setting JAWS to Read Column and Row Titles in MS Excel

One of the most popular questions I'm asked by JAWS users is how to set up the automatic title-reading in Excel so that, when you are in a table of data, JAWS will automatically read the column or row titles as you move around the data. I actually covered this subject with NVDA in a previous post here all the way back in 2014 but, as one reader recently pointed out, a more JAWS focused piece on this subject would be appreciated. So, finally, here it is - although please note that what we are doing here will also work in NVDA.

Setting the Column and Row Titles Manually

Once upon a time, setting the column and row titles in Excel with JAWS was all about locating the right area(s) in the worksheet and manually setting the titles. You'd move the cursor to the right row (if you were setting column headings) or the right column (for row headings) then use a specific set of hotkeys to assign these in JAWS. Now, this is something that you can actually still do with JAWS, and it's a technique that everyone who uses JAWS and Excel should learn to do. So, with that in mind, let's quickly run through the basic manual process with JAWS V16:

  1. Open a new workbook in Excel and type Bought in cell B1 and Sold in cell C1.
  2. Use the ARROW KEYS to move to cell A2 and type Apples, DOWN ARROW to cell A3 and type Bananas and DOWN ARROW to cell A4 and type in Oranges.
  3. With your column and row titles in place, move up to cell A1 - note that this is the only cell where the column heading row (row 1) and the row heading column (column A) intersect.
  4. Now, with focus always in A1, use the following hotkeys to set both row and column titles. (By the way you may want to limber up the fingers before attempting them):
    • INSERT ALT CONTROL C to set the column titles to the current row (row 1).
    • INSERT ALT CONTROL R to set the row titles to the current column (column A).
  5. When you have done this, test out the column and row reading. Move between cell B2 and C2, in each case JAWS should indicate the column title as you move. Also, move between the second, third and fourth rows - JAWS should indicate the row title. If not, then try saving your Excel file and reopening it. When you have finished experimenting, close the file.

This all manual approach is still very useful and it is one that I always coach JAWS users in; having full manual control of where and when to set your column and row headings will always come in handy. The downside of having to take this route however is that, because the title information sits in a JAWS settings file, if you email the Excel workbook to another JAWS user you're forcing that person to take the same steps you did. Okay, you can send a settings file on but really you're kind of passing on a bit of extra work here when the user probably just wants to work with the data in the spreadsheet. Which all brings us nicely back to where we started - setting automatic title reading in Excel.

Setting Named Ranges for Automatic Title Reading

Anyone who has used Excel more than a few times will know that you can highlight a range of cells and give them a name. These named regions are generally done to make things easier to understand in the worksheet. For example, several columns of cells could be given the name of "sales" and this name can then be referenced in a formula: =SUM(Sales) - instead of using the typical range details such as: =SUM(B4:G55). If you think of a really complex worksheet with loads of data I'm pretty sure you can see the benefit of having to remember names and not cryptic cell references.

However, what is not commonly known is that JAWS and NVDA look for specific named ranges in a worksheet and can then use that information to relay the associated column and row titles back to the reader. Clearly, the benefit of this is huge because the author or creator of the worksheet can set this up and it will just work for all the JAWS users who access that data. It also takes away that often torturous task of trying to figure out just where the author put the column and row headings in the first place!

Okay, so let's go through setting this up. We need to be a little careful here because JAWS is very pedantic about the naming - that's the point in fact, JAWS is looking for specific names in the worksheet as locators for the data it needs to echo. The following example will sound familiar if you worked through the previous one:

  1. Open a new workbook in Excel.
  2. In cell B1 type Bought in cell C1 type Sold.
  3. Use the ARROW KEYS to move to cell A2 and type Apples, DOWN ARROW to cell A3 and type Bananas and DOWN ARROW to cell A4 and type in Oranges.
  4. As before, move up to cell A1 - this being the cell where the column heading row (row 1) and the row heading column (column A) intersect. As they intersect in this same cell, we can set the column titles and the row titles in one go.
  5. IMPORTANT NOTE: Before you move to the ribbon to set your named ranges you must ALWAYS make sure you have placed the cursor in the right cells for the title reading effect you are trying to achieve. So, if you are setting both column and row titles at the same time, focus your cursor on that single intersecting cell. If you are setting row headings only, then put your cursor in the column containing your row headings. Similarly, if you are setting column title reading only, focus the cursor in the row that contains the column headings to be read. If your column headings are split between two rows then select the rows before continuing with the next steps.

  6. Now use ALT to move to the upper ribbon in Excel and move to the Formulas tab either manually with the LEFT or RIGHT ARROW or by using the M hotkey.
  7. With the Formulas tab active, DOWN ARROW to the lower ribbon and TAB along until you hear JAWS indicate: "Define Names group box, Name Manager button." Use SPACEBAR to activate this button and move into the Names Manager dialog box. (Note: the full Office hotkey sequence for this is ALT, M, N.)
  8. TAB around if you want to explore then focus on the New... (ALT N) button and use SPACEBAR.
  9. Focus will now be in the New Name dialog box, TAB around to get a feel for the options. I'm using Excel 2010 and the choices I have are as follows:
    • Name: This is where you need to type the exact text label that JAWS requires, more on this in a short while. The hotkey for this field is ALT N.
    • Scope: Here you indicate if the name is sheet specific or for the workbook. As far as we are concerned, the default setting of workbook is fine. The hotkey for this is ALT S.
    • Comment: This is where you can type in a comment for the named range. I always suggest adding a comment to let everyone know that this named range is required for JAWS title reading and shouldn't be deleted. The hotkey for this is ALT O.
    • Refers To: The last field you need to check shouldn't need any input - as long as you placed the cursor correctly in the worksheet of course! The hotkey for this field is ALT R.
  10. With focus in the Name field, and as we are setting both row and column titles at the same time because of the intersecting cell, I can type in the required label which is: Title1. That is: capital t, i, t, l, e, number 1 - all as one word. Note: the number on the end refers to the position of the worksheet in the workbook - so if it was the second worksheet it would be a 2 instead of a 1 and so on.
  11. New names dialog box showing the Title indicator for JAWS title reading.
  12. TAB takes me to the Scope field, it is set to "workbook" already, so that's cool.
  13. TAB again takes me to Comments so I type in my standard JAWS title reading warning about how if this gets deleted there will be all out thermonuclear war in the office. Only joking, but you get the message...
  14. Another TAB moves focus to Refers To which is set right, pointing to Sheet 1 and cell A1. If you position your cursor before you start the process this will always be right and you can just TAB on to the OK button and use SPACEBAR.
  15. Focus will drop back to the Name Manager dialog box and now TAB around to the Close button and use SPACEBAR to return to the worksheet.

At this point I normally save the worksheet and close Excel completely, before going back in to the file and testing out the column and title reading to see if it has worked. There are times when you set this and try it out that it doesn't seem to be working but then you'll open the file back up after a reboot and - lo and behold - the title reading works! So if the auto title reading doesn't work straight away don't be too alarmed, try a restart and see what happens then.

If it still doesn't work - try NVDA. Ouch...

Setting Column or Row Titles Only

Of course, there will be times with certain layouts and types of data that you will only have a row of column headings or a column of row headings. In each of these cases you need to use a different text label than "Title" - which you only use when there is an intersecting cell between your column and row titles.

Let's go through another example, this time a small table of data that uses names as row headings:

  1. Move to a new worksheet in an existing workbook or create a whole new workbook.
  2. In cell A1 type in a name - I chose "Marty" no idea why - and use ENTER so that by default the cursor will land in the cell underneath. Type another name in cell A2 and use ENTER to move to cell A3, add another name in that cell.
  3. Now that you have a few names in the column to act as your row headings, move to cell B1 and type in a random number. Do the same in cells B2 and B3.
  4. When you have added your numbers, move the cursor back and focus on a cell in column A. It is important to focus the cursor so that it is in the right place in the spreadsheet for what you are setting - so, in this example, my row headings are in column A so I need to focus in there before going to the upper ribbon.
  5. Navigate to the Name Manager button in the Formula ribbon tab as before and activate the New... button. The quick hotkey Office sequence for this is ALT, M, N, ALT N - if you do this focus should be in the Name: field of the New Name dialog box.
  6. In the Name: field, this time around, type in the following label: RowTitle1 (capital R, o, w, capital T, i, t, l, e, number 1 - all as one word. (By the way if you are on worksheet 2 of your workbook, replace the number 1 with number 2 - remember the number at the end indicates the worksheet number. If you created a new workbook and you are on sheet 1 of that workbook then you can stick with number 1 or even omit the number entirely.)
  7. TAB through the other fields and complete as necessary, maybe including a comment to stop accidental deleting of the new name region.
  8. TAB to the OK button and use SPACEBAR, then TAB round to the Close button and use SPACEBAR also. With focus back in the worksheet, test out the title reading with JAWS.

But what if you need to set column titles and not row titles? In this case you do exactly the above but replace RowTitle1 (capital R, o, w, capital T, i, t, l, e, number 1) with ColumnTitle1 (capital C, o, l, u, m , n, capital T, i, t, l, e, number 1) instead.

Now, Something For Everyone To Do

The great thing about these named range best practice techniques is that everyone can adopt them to help make their Excel worksheets more accessible to speech users. So, if you are reading this and want to make a small difference to someone's day in the office, get this information passed around.

Let's do a little recap just to finish...

  • For column and title reading, where the column headings row and the row headings column actually intersect, use the label: "Title1" (where 1 indicates titles for Sheet 1).
  • For column reading only, use the label: "ColumnTitle1" (where 1 indicates titles for Sheet 1).
  • For row reading only, use the label "RowTitle1" (where 1 indicates titles for Sheet 1).
  • Remember the number included at the end of the text label indicates the number of the worksheet. For example, "RowTitle3" sets the row titles for the third worksheet in the workbook, while "ColumnTitle2" will set the column titles to the current row in the second worksheet. Also, before you go to the Names Manager dialog box, you must ensure that you place your cursor in the right cell, column or row for the titles you are attempting to set.
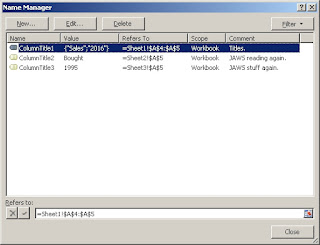
Name Manager dialog box, shows three title assignments with the first ColumnTitle1 assignment spanning two rows.

And always remember, should the unthinkable happen and JAWS just refuses to pick up on the title regions in the worksheet (yes, this has been known to happen quite a lot) you can also insert a comment in cell A1 containing helpful information, such as the start cell location of any column and row headings. That way another JAWS user can go straight to those areas with the headings and set things up manually using the techniques mentioned at the top of this post. In fact, I post something a while back on using comments for exactly these purposes and you can find it here in the blog.

In a future post I'll explore the multi-region options for automatic title reading but for now, your mission is simply to spread the word, and get everyone you know who uses Excel to spend a few extra seconds creating useful Title, ColumnTitle or RowTitle name ranges.

Monday, 12 September 2016

Email Signatures - Outlook 2010 – JAWS

Creating a New Email Signature

Creating a signature in Outlook is one of those frustrating exercises that crops up now and again - one of those tasks you never complete regularly enough to maintain perfect recall of each step every time. So, in this post, I'm going to step through how I approach creating a new email signature in Outlook 2010 using JAWS V16. As with all my step through work, the process here may need a bit of tweaking on your part to allow for differences in Office and JAWS versions. Also, you probably use different JAWS hotkeys and methods to me anyway – which is great I might add – because the reality is that there are always 2 or 3 ways to achieve the same thing. Anyway, with all that in mind, let's get to it...

Creating a Quick Email Signature in Outlook 2010

  1. Launch MS Outlook 2010 and navigate to the File tab using ALT F.
  2. DOWN ARROW to the Options item in the menu and use ENTER or activate it directly using the hotkey of: T.
  3. DOWN ARROW to the Mail item in the Outlook Options dialog box then TAB to the Signatures button (or use ALT N). Activate this button to open the Signatures and Stationery dialog box.
  4. First, TAB around this dialog box to get a feel for the options there then, when you have finished exploring, locate the New button (ALT N) and activate it. This will launch the New Signature dialog box which will prompt you for a name for your new signature. Type one in (for example: formal work, internal only, informal and so on) then use the ENTER key.
  5. Focus will still be on the New button so TAB all the way round to the Font Face combo box.
  6. By default this will be set to something like Calibri but feel free to change this to something else. In fact, if you are making a work signature, you'll probably have to select one of the corporate fonts installed in your company. I tend to go for plain old Arial which is our standard font inside RNIB. Anyway, complete this field by either typing in what you need or by using ALT DOWN ARROW to expand the list and choosing from there. When you've picked your font, move on with TAB.
  7. Now this form can have some peculiar behaviour and it's down to Microsoft making this toolbar different from the rest of the dialog box. So, if you find yourself getting confused, just TAB around the fields again and refocus.
  8. Focus on the font face dialog box and change this to whatever is required before using TAB to move on again.
  9. Keep using TAB until you have focus on an unlabelled edit or input area. JAWS may well read some odd information about this field and if you are in any doubt, TAB your way to the hyperlink button and then TAB once - this is the field you need to be in.
  10. Now type in your signature exactly as you want it to appear at the foot of your email. A simple formal work signature for example might be as follows:
  11. Harry Blender
    Chrome Holdings Incorporated
    http://www.CHI.com
    0883 7823910
    * Twitter and LinkedIn links here etc*
  12. Signatures conform to a less is more approach so don't go overboard. Include the important contact details and anything else of particular importance and generally try to keep it to around 5 or 6 lines of text. When you are done, check the text and ensure that the lines of text are correctly formatted and spelled.
  13. When you have finished, use ALT S to save your signature.
  14. Although focus will be on the OK button you may want to TAB back around the options and check them. In particular, the New Messages: combo box can be set to point to one of your current email signatures. Doing so means that every time you create a new message the chosen signature is already present in the main edit window of the email. Of course, if you want to manually choose what signature is included when you send an email then you need to ensure the New Messages combo box is set to none.
  15. When you have finished checking, TAB to the OK button and activate it with SPACEBAR. Focus will return to the Outlook Options dialog box so once again move to the OK button and activate it with the SPACEBAR.

Now you need to test out your new signature.

Applying the New Signature

  1. Create a new email message and type in some example text.
  2. Ensure the cursor is left in an appropriate position as this is where your chosen signature will be inserted into the email.
  3. Use the keystroke sequence of ALT N, A, S to move focus to a small menu that contains the names of your signature files.
  4. ARROW UP or DOWN the menu to focus on the appropriate signature and use ENTER to insert it in the email.
  5. Check the text of the chosen signature and remove any extra blank lines - that's it!

So that's it for email signatures - at least for now...!

Thursday, 23 June 2016

Acrobat Reader - JAWS - PDF - Accessibility

Checking PDF Accessibility with Acrobat Reader

Introduction

Not all PDF files are equal in terms of accessibility but, thankfully, the days of opening a PDF file to be greeted with complete silence are (mostly) gone. But, while there is now ample opportunity for creating more accessible fields it shouldn't come as too much of a surprise to learn that it is still possible to create a PDF file that is somewhat less than stellar on the accessibility front.

Broadly speaking there are two types of PDF, one which is image based and the other which is based on an existing document such as a Word document. But how do you know which is which straight from the off? How can you tell if a PDF you have is an accessible one? Or, at the very least, one that gives you a fighting chance of getting some quality feedback out of it?

Checking in Acrobat Reader

The main software used to work and manipulate PDF files is now called Adobe Acrobat DC (the DC standing for Document Cloud) but this is an expensive route unless you are continually working with PDFs. However, if you are one of the lucky souls who uses this software then great because you can open your PDF in the application and use the "Accessibility Checker" to report on the quality of the file. The "full report" is especially useful and will give you a complete breakdown of all of the elements in your PDF and whether they pass the accessibility checks.

However, most of us don't have the full Acrobat software, instead we run with the free to download Acrobat Reader. After all, we're only interested in being able to read the file in the first place and, if you are using a screenreader like JAWS, then there is some specific JAWS support built-in for that application.

What is not common knowledge is that there are some tips and checks that you can use in Acrobat Reader to check your PDF file. For example, if you are a mouse user, can you drag your mouse pointer over the PDF text to highlight it line by line? If so, then it is proper electronic text in the page. This means that your screenreader using colleague might just stand a chance of reading something but, if your mouse pointer creates an area selection, then it's likely you have an image only PDF. And, in this case, you are instantly in the realm of using OCR - and that's a future blog post by the way...

Image showing the details that can be accessed in Document Properties, such as whether the file is tagged.

A good keystroke to get used to in Acrobat Reader is CONTROL D as this opens the Properties multi-tab dialog box where you can check more advanced information on the file. Open any PDF file you have on your PC in Acrobat Reader and use CONTROL D to launch the Properties dialog box. (Alternatively, open the File menu, ARROW DOWN to Properties and activate with ENTER.) With the Properties multi-tab dialog box open, check the following areas:

  1. In the Description page, locate the "PDF Producer" setting. Ideally, the PDF Producer setting will indicate recent versions of MS Word or LibreOffice or something similar – if it mentions the word "image" or "scan" then beware. For example, I have an old PDF file that is a scan of a magazine article I enjoyed reading. I created this PDF using an old scan to PDF plugin so , while I can read it visually, I can't access it at all with a screenreader. The only option with something like this is to convert the file to text through OCR.
  2. Also in the Description page, locate the "Tagged PDF" details, which will either be a "No" or a "Yes" value. Bear in mind that a "No" does not necessarily mean that a screenreader won't read the text in the file but it is an indication that it won't read it all correctly. Having said this, a tagged file doesn't mean that the text is guaranteed to be spoken in the right order either although if the setting is "Yes" you should find that the text-reading is generally more flowing and logical. The bottom line is, you are really after a "Yes" here.
  3. Use CONTROL TAB to move to the Security page and locate the Content Copying for Accessibility setting. This should be set to "Allowed" - if it is set to "Not Allowed" then this may indicate that the current security settings of the file will prohibit some assistive technology from accessing the information in it. Once upon a time, the over-zealous nature of a lot of PDF security virtually guaranteed accessibility problems and a straight to OCR route. Those were the days...!

So, from the Properties dialog box you can get a pretty good indication of the likely issues and state of the current PDF file before you read it. Ideally, with an accessible PDF file, you will have all of these basic settings in place.

Using Read Out Loud

While checking the basic details is all well and good the absolute acid test is to use some text to speech and read the file. Acrobat Reader actually has its own built-in text to speech called Read Out Loud. Activate it in the following way:

  1. Open the View menu in Acrobat Reader.
  2. UP ARROW to the Read Out Loud item, then RIGHT ARROW or ENTER to move to the submenu.
  3. In the submenu, choose the top item of Activate Read Out Loud and use the ENTER key to launch.
  4. Alternatively, use the shortcut of CONTROL SHIFT Y to activate Read Out Loud directly.

With Read Out Loud active, you can control the speech in the following way:

  • Stop reading: CONTROL SHIFT E
  • Read the current page only: CONTROL SHIFT V
  • Read to the end of the current document: CONTROL SHIFT B
  • Pause reading: CONTROL SHIFT C

While Read Out Loud is handy, especially for sighted PDF creators who may not have direct access to a full blown screenreader, a TTS tool is no substitute for the latter. In my opinion, the best way of tackling the accessibility and the nuances of how text flows in a PDF file with speech, is to ask a few screenreader users if they wouldn't mind reading it. And while you are doing this, how about seeing if a few magnification users can read your PDF file at a higher level of magnification? Doing this will give you far greater insights into how well your design communicates across a more diverse readership. And isn't that what it's all about..?

Friday, 12 February 2016

Quick Search - Filter - MS Outlook 2010

Filtering with Quick Search in Outlook 2010 using JAWS

3..2..1.. and I’m back in the room! It’s been quiet on my blog for a while (thank you project work) but now it’s time to get back to serious blog business in 2016. And what better way to kickstart things again than with a few tips and tricks on searching in Outlook 2010, specifically filtering using the Quick Search field in Outlook.

Way back in a post from January 2015 I covered the basic quick search option in Outlook 2007 that we all know and love. In that article I outlined the basic ability of the Quick Search feature to find emails with specific keywords either per folder or across all folders. Now that I have upgraded recently to Outlook 2010, I’m going to demonstrate some of the additional searching options – using Start Menu Live Search techniques – that you can use for more controlled mailbox searching.

Now, the options that I am going to go through here are my own particular favourites, biased very much towards the way I work in Outlook. So I encourage you to take this information and explore some different ways to search through your Outlook data - and if you find anything really useful you want to share please leave a comment. Okay, let’s go through some steps.

Search a Date Range in Sent Items

It never fails to surprise me how much effort goes into organising - or attempting to organise - incoming mail while outgoing mail simply languishes in an increasingly massive and untidy pile. The techniques here will work in spite of this, helping you find particular emails between a specific period of time for example:

  1. Move to your Sent Items folder.
  2. Use CONTROL E to move focus to the Quick Search edit field.
  3. Type in: Sent: DD/MM/YYYY .. DD/MM/YYYY. (For example: Sent: 01/01/2016 .. 10/01/2016 or Sent: 10/01/2015 .. 14/03/2015)
  4. With JAWS, an easy way to check if your filter is giving you roughly appropriate results is to read the number of items in the Status Bar for the current window. Use the JAWS keystroke of INSERT PAGE DOWN to achieve this.
  5. If your filter is not working, check your syntax. It should be: Sent colon, first date in standard format, space, dot dot, space, second date in standard format.
  6. When the filter is applied correctly, move to your list of emails using the TAB key and navigate in the usual way using the UP and DOWN ARROW KEYS.
  7. When you have finished, clear your search filter by using CONTROL E then TAB to the Close Search button. Use SPACEBAR to activate.

Filtering in Text Fields with AND, NOT and OR

Using a similar approach, it is easy to find emails that contain key words in specific columns. Try the following:

  1. Move to an email folder that contains the Subject column, such as Inbox or Sent Items.
  2. Use CONTROL E to move focus to the Quick Search edit field.
  3. Type Subject: followed by an open bracket (Subject colon open bracket) then type your first search word.
  4. After you have typed in your first word, leave a space, then decide on what you need to do next. Choose whether you:-
    • Need to search for a string of words, in which case you’ll need to use the AND function.
    • Need to search for specific words that are not necessarily related, in which case you need to use the OR function.
    • Need to search for a word which is not specifically associated with another word, in which case you need to use the NOT function.
  5. Type the appropriate function in upper case, followed by another space and then include your next search word. Repeat these steps as necessary.
  6. With the filter finally in place, navigate your list of results in the usual way.

A bit more involved this one, so here are some real world examples. Just substitute your own search words:

  • Subject:(braille AND magnification) – This will return email results that have the words braille and magnification in the subject line.
  • Subject:(braille NOT magnification) – This will return email results that have the word braille, but only those that do not contain the word magnification.
  • Subject:(braille OR magnification) – This will return email results that have either of the words braille or magnification in the subject line.
  • Subject:(braille AND magnification AND speech NOT OCR)- This will return email results that have the words braille, magnification, speech in the subject line unless the subject line also contains OCR.

NOTE: If you need to search for a text string in a specific order then you need to use double quotes. For example: Subject:"One Upon A Time" or Subject:"Training Summary and feedback".

Finding Emails Using the Size Column

The information sometimes displayed in the Size column gives us the ability to run some neat filters via quick search. This can be useful if you are looking for an email or emails that have attachments - which is a pretty common task. Using similar techniques to what we have explored already, try out the following:

  1. Move to an email folder that contains a lot of emails with attachments.
  2. Use CONTROL E to move focus to the Quick Search edit field.
  3. As before, what you type in next depends on what you need to do. Here are some examples:
    • Size:1KB .. 10KB - find emails that have a size between 1 and 10 kilobytes.
    • Size:>2MB - find emails that have a size equal to or greater than 2 megabytes.
    • Size:<500KB - find emails that have a size less than 500 kilobytes.
    • Size:1MB - find emails that are 1 megabyte in size.
  4. With the appropriate filter in place, move to your list of results with the TAB key and navigate in the usual way.
  5. When you have finished checking, use CONTROL E to move back to the Quick Search Edit Field then TAB to the clear search button and activate this with SPACEBAR.

Quick Search and Follow Up Flags

To finish the post, I'm going to walk through setting some follow up flags on emails and then using some Quick Search techniques to keep track of what I'm doing. try this:

  1. In your Inbox, move to an email you need to respond to and call up the context menu with SHIFT F10 or the right hand Windows application key on your keyboard.
  2. DOWN ARROW through the menu until you reach the Follow Up submenu.
  3. In the Follow Up submenu, choose and apply a follow up option such as Today or Tomorrow. (For the purposes of our exercise here what you choose doesn't really matter.)
  4. Now repeat the above steps for another couple of emails in the list.
  5. With a few emails now flagged, use CONTROL E to go to the Quick Search edit field and type in: Flagstatus: follow.
  6. If you are using JAWS, read your Status Line with INSERT PAGE DOWN - notice that your results list is now whittled away to just your flagged emails.
  7. Navigate to your list of emails - which is now effectively a dynamic "to do" list - and deal with them as required.
  8. When you have actioned one of the emails, remove the follow up flag status by going into the context menu again for the item and choosing either the "Clear Flag" or the "Mark Complete" option.
  9. When you have finished with your flagged emails, move to the Quick Search edit field with CONTROL E and TAB to the Close Search button and activate it with the SPACEBAR.

Okay, I hope that has whetted your appetite to experiment more in the Quick Search edit field - to really get it working for you. And if you discover some other neat tricks then please let me know about them by leaving a comment.

Have fun!

Monday, 2 November 2015

Title Reading – Tables – JAWS – MS Word 2007 – Accessible Information

Accessible Tables: Automatic Title Reading with JAWS

An ever present in my workplace is making sure that everyone is doing their bit to make information more accessible. It always amazes me just how much this base theme - that not everyone does things the same way you do - feels like such a game changer in the office. But that’s the platform right there, get that in place as a baseline and the world of accessibility and usability begins to feel like a freedom and not a penalty.

When it comes to accessible documents, specifically accessible Word documents, there are some things to be mindful of – in fact, I posted a table of some of these elements in an earlier post – but there’s also a few extra bits on top of these broader elements which could be seen as going that extra mile.

In this post I’m going to walk through one of these digital garnishes, one of those additional techniques that you can embed in your existing best practice without too much extra effort.

Automatic Table Titles in MS Word

When a JAWS user encounters a table in a document, the screenreader indicates the table object and will allow the use of a bunch of hotkeys specifically for use in tables. Many users though simply ARROW KEY or TAB KEY their way through tables, gradually building up a picture of the content. To aid this navigation and understanding of the content, you can use a little known trick to automatically read out the column and/or row titles. Let’s go through how this works.

  1. Open an existing Word document that contains several tables or create a new test document with a couple of tables in it. (I’ve created a test document for this purpose, with a heading and a couple of small uniform data tables.)
  2. Navigate to the first table and locate the titles – if you have any of course! Assuming that you do, depending on the type of data you are displaying, you need to think about the type of titles you require and where you need to place your edit cursor to get this right. So:
    • If you only have column titles, focus the cursor in the row that contains the column titles.
    • If you only have row titles, focus the cursor in the column that contains the row title.
    • If you have both row and column titles, focus the cursor in the specific cell where the column title row and the row title column intersect. In a typical table, this can often be the very first cell.
    With the cursor placed appropriately, move to the upper ribbon with ALT and ARROW RIGHT to the Insert tab.
  3. Use DOWN ARROW to move to the lower ribbon for the Insert tab then use the TAB key to move along to the Bookmark button. Activate the Bookmark feature with the SPACEBAR.
  4. With focus in the Bookmark dialog box, specifically the "Bookmark Name edit combo box" (ALT B), type in the bookmark text that is appropriate for the type of titles you have in your table. So:
    • For column titles only, type ColumnTitle. (Capital C Capital T, no space in between)
    • For row titles only, type RowTitle. (Capital R Capital T, no space in between)
    • For both row and column titles, type Title. (Capital T)
  5. When you have typed in your bookmark text, use ALT A to activate the Add button. The bookmark will be confirmed and the dialog box will close.
  6. With focus back in the document, navigate through the table – notice that JAWS is now speaking the titles automatically when you move to the next column or row.

The benefit of this bookmarking scheme is that, when you save your document you also save the accessibility – this gives any JAWS user a head start with their table reading. So, it is worth remembering popping these bookmarks in when you need to.

More Than One Table in the Document?

But what if you have more than one table in your document? In this case you need to ensure that you provide unique bookmark names. Bear in mind that your JAWS bookmarks must always begin with the text outlined above to which you can add an underline (bookmarks do not contain spaces) and then add more text. You can create bookmarking schemes as necessary, take the following examples:

  • RowTitle_Number_One
  • ColumnTitle_Sales_Figures_10
  • RowTitle_First_Table
  • ColumnTitle_Page1_table

In each case make sure you use the appropriate text for your row and column titles, add an underline, then type another word in. Alternatively, you can add another couple of words, each separated with an underline. Try not to make the bookmarks too unwieldy though - keep things as straightforward as possible.

Pretty neat trick this one. And now that you know all about it, your job is to pass the information on to other users of MS Word so they can add it to their best practice information. Have fun!

Wednesday, 28 October 2015

FS Clipboard – JAWS - MAGic

Using the FS Clipboard - JAWS - MAGic

If you use any kind of AT software you’ll be well aware of some of the additional tricks that you can pull off to make your daily digital life that little bit easier. One of those little helpers is the FS Clipboard feature, available in both the JAWS screenreader and also MAGic, the magnification and speech software also produced by Freedom Scientific.

FS Clipboard adds a bit of spin to the normal Windows clipboard as you append rather than replace any existing content. Normally, when you select some text and use CONTROL C to copy to the clipboard, what you are copying replaces the current contents of the Windows clipboard. However, with the JAWS and MAGic FS Clipboard feature, every time you copy you add to the existing contents as opposed to replace them. Let’s go through an example.

Appending Content in the FS Clipboard

In this example, we’re going to create a list of reference numbers and then copy some of those numbers to the FS clipboard for pasting in later in a new location. I should add that if you are running JAWS or MAGic the steps are identical.

  1. Open a new document in MS Word or equivalent.
  2. Type in a few lines of data, something like ten should be enough. I’ve chosen to create some short references, like this: A1001, A1002, A1003 and so on.
  3. Now, move to the top of the list with CONTROL HOME and select the first reference number using SHIFT with the ARROW KEYS.
  4. Remember you can repeat what is currently selected using INSERT SHIFT DOWN ARROW in JAWS and MAGic. (With MAGic you may also use the MAGic key of CAPSLOCK instead of INSERT.) Additionally, if you are using JAWS, you can use INSERT SHIFT DOWN ARROW twice quickly to have your selection spoken character by character.
  5. With the content selected and checked, instead of using the standard Windows keystroke of CONTROL C, use INSERT WINDOWS C to copy instead.
  6. Move the cursor in your list now and choose one of the other reference numbers. Select it as before and copy to the FS Clipboard with INSERT WINDOWS C. Repeat this step another couple of times.
  7. With a few entries now in the FS Clipboard, let’s check the content. Use INSERT SPACEBAR, then tap letter C (MAGic users can also use CAPSLOCK SPACEBAR instead). A virtual viewer will open and from there you can read all the text you have copied. When you have finished checking the content, use ESCAPE to close the viewer.
  8. Now move the cursor to a new position and paste in the FS Clipboard contents using CONTROL V. Check that everything is as you expect it to be – you’re done.

A neat finishing touch to this FS Clipboard feature is that if you accidentally use CONTROL C instead when you are copying your data, it doesn’t wipe the FS Clipboard content immediately. JAWS or MAGic will pop a warning message box up on screen indicating that if you continue you’re going to lose the content in the FS Clipboard contents. Very nice – because if there is one keystroke that everyone knows by instinct, it’s got to be CONTROL C!

This is an image of the warning message that appears if you accidentally use control C when using the FS Clipboard. There's a Yes button, to continue and lose the contents of the FS Clipboard. Alternatively, there is a No button to cancel.

The FS Clipboard is a useful tool that has been around for a while, so if you are using JAWS or MAGic and are often faced with moving non-contiguous data from one location to another, this is an option worth adding to the toolbox if you haven’t already.

Until next time, have fun!

Wednesday, 21 October 2015

Freeze Window - Zoomtext V10

Freezing a Window in Zoomtext V10

If you’ve been wondering why things have been a bit quiet round here the last few weeks it’s because I’ve been busy moving house – which is always good fun, if not always for the right reasons. Now that the dust has settled somewhat and I’m a bit more comfortable living in the remaining boxes with a paint brush in one hand, it’s time to get back to blog business.

A reader of this blog asked me recently whether the blog “is all about JAWS?” Although I indicated otherwise, upon reflection there is a fairly JAWS heavy feel to it so it’s about time I balanced things out a bit more and spread a little more love to my non-JAWS using readers. And what better way to do this than with a walkthrough of that much under-used Zoomtext function: Freeze Windows.

The Freeze Window feature works in full screen mode only and allows you to keep a section of the screen in focus while you navigate around the screen. In other words, you can drag over a bit of the Desktop and keep it in the zoom window while you are scrolling around looking at different parts of the screen. It works best with an area of the screen that is not likely to get obscured by an overlapping window and, with that in mind, let’s walk through a useful example.

Creating a New Freeze Window

Remember that this freeze window feature only works when you run Zoomtext in full screen mode. Notice that if you are in any other screen mode, such as Line or Lens or Overlay (by the way, who actually uses Overlay?) then the Freeze option will be greyed out.

Our example here is going to set a freeze window around the 24 hour clock in the system tray area at the bottom right hand corner of your Desktop. Setting a freeze window around the clock means that you can always see the time no matter what you are working in. Let’s get started:

  1. With Zoomtext running, ensure that you are in full screen mode by activating the Type menu button on the Magnifier toolbar and choosing Full from the list if it is not already ticked.
  2. Return to the Type menu and choose New from the Freeze submenu.
  3. Image showing the Freeze submenu in the Zoom Window type toolbar in Zoomtext V10.
  4. Notice a small icon now following the mouse pointer. Move the mouse pointer down to the bottom right of your Desktop – position the arrow so that the tip of the mouse pointer is at the bottom right of the time display.
  5. Now hold the left mouse button down and drag diagonally to the top left corner of the time display. Notice how a small reverse video box will cover the area you are "dragging" over. This area will be your freeze window.
  6. When you are happy that the window is right, let go of the left hand mouse button.
  7. Notice some white drag handles have appeared around the border of the freeze window area, you can use these as necessary to make slight adjustments to the frozen window area. Left click and drag to move them as necessary.
  8. After making any sizing adjustments, position your mouse pointer over the area you have just "frozen", hold the left mouse button down and drag the whole frozen window to another position on the screen. For example, some people like having their time display freeze window situated in the top right corner of the screen so that it doesn’t get in the way when you are working.
  9. NOTE: It may take a few tries to get used to this, so if you need to start again just go back to the Freeze submenu and choose New to restart.

  10. With the resizing and repositioning done, confirm everything using a single tap of the right hand mouse button.
  11. With your new freeze window on screen, you can use the enable and disable freeze window keystroke of CONTROL SHIFT E to control the feature.

Okay, the freeze window feature is hardly going to change the world but, for specific things, it is well worth experimenting with if you are in full screen mode most or all of the time. And if you discover some great new uses for this feature then please let me know so that we can share with other readers. Until next time, have fun!

Tuesday, 8 September 2015

JAWS V16 Keystroke Search

Search for a Keystroke Feature in JAWS V16

Increasingly these days I find myself feeling more than a little underwhelmed as I greet the next AT software upgrade. Once upon a time I might have read through the release notes with some excitement, these days... not so much. Partly, this is due to some fairly mediocre updates - I think everyone gets a bit jaded when software updates aren't as sparkly as the hype suggests. But it's also increasingly about the downside of upgrades, being more concerned with what might get broken in the process and really thinking about whether any update is worth the risk now.

Having said all of that, I made the jump to JAWS V16 recently and, one of the new features I've been playing around with, is the JAWS command keystroke search feature. Actually, it's pretty good. Finally, a convenient way of making sense of the sheer mountain of JAWS keystrokes built into the software!

What is the JAWS Command Search?

Anyone who uses assistive technology such as JAWS will be all too aware of the cognitive payload involved in learning and using that software. Put simply, there's a huge amount of stuff to remember and think about. Now, while it is true that in programs such as MS Word you can fluff about a bit and get reasonable results. It's also true that when you move to a more challenging software environment, you'll soon hit the point where your JAWS experience relates directly to how much hotkey functionality you know.

This isn't just an AT thing. Over the last few years we've started to see complexity being hit in diffrerent ways. The "live" searching used in Windows and "Dash" in Ubuntu to name but two together with the rise of the voice input PA such as Siri and Cortana, are all designed to streamline the strain rather than let it spill over the edges. Even JAWS itself has dabbled with a live search style of interface, as anyone who has worked in the Settings Centre can tell you. So it comes as no suprise really that JAWS V16 finally unveils a feature designed to give you meaningful hotkey information at the point you actually require it.

But what about the old hotkey and windows key help systems? Well, the JAWS Help systems we all know and love are still there but, while they've always been and continue to be very comprehensive, they've never been particularly flexible or even friendly. Often what is required is a helping hand or quick memory aid, not a window containing a whole catalogue of hotkeys. By comparison, the new JAWS Command Search is effectively a built-in search engine for JAWS keystrokes. For example, maybe you can't recall the hotkey to list all the footnotes in the current Word document? Type in "footnote" and instantly a list of keystrokes with matching descriptions appears. Or maybe you're in Excel and can't recall the keystroke to list all the visible cells with data, once again type in "data" and "list" and you're on your way. Or what about JAWS hotkeys that relate to charts? Just type in "chart" and you're good to go.

Launching and Navigating the JAWS Command Search

I'm going to base the following walkthrough on an example I mentioned earlier - listing visible cells with data in Excel.

  1. With JAWS V16 running and focus in Excel, launch the new command search with INSERT SPACEBAR then J. (Hold down INSERT then SPACEBAR - at which point you will hear a sharp clicking sound - then use letter J.)
  2. JAWS will announce "Search For JAWS Commands dialog" with your specific focus in the "Search For: edit" field.
  3. Now type in what you are looking for. (I'm using "data" and "list" but try out whatever you want.) As you type, a results list will appear and automatically adjust with matches relevant to your search string.
  4. Use the DOWN ARROW to move the virtual cursor as you would in any webpage and read the results.
  5. NOTE: The command search page is HTML, so you can use the usual web page navigation keys to move through the results that appear. For example, the H quick key or the number 3 key (each keystroke heading link title is level 3) both work well. Or, if you prefer, you can launch your list of headings with INSERT F6 or you can choose to navigate using the trusty list of links (INSERT F7).

  6. Each entry in the results list has a title followed by a description of the hotkey and its function. For example, in my search using "data" and "list" I receive the following feedback:
  7. List Visible Cells With Data.
    Control + Shift + D
    Lists cells with data visible in the active window and allows the user to move to the selected cell.
  8. When you have found the information you need, either run the chosen command using the heading link or close the HTML search page using the ESCAPE key.
  9. To run another search, move back up to the edit field, make sure you are in Forms Mode and type in your new search terms.

Pretty neat isn't it? Let's run with another example.

Column Titles in Excel with Command Search

Here's another approach you can take with the new command search. Not only is it great for getting the information in the first place - it can also help out with those tricky three and four finger keystrokes. Manually assigning column titles in an Excel worksheet I'm looking at you...

  1. Open a new worksheet in Excel and type a column title in cell A1, B1 and C1.
  2. For some added drama, enter some data in cell A2, B2 and C2.
  3. Move the cursor to a cell in row one.
  4. Launch the command search feature with INSERT SPACEBAR, J and type "Set Column" in the edit field.
  5. DOWN ARROW to the "Set Column Titles to Row Range" heading link and use ENTER to activate the command.
  6. Focus will now return to the Excel worksheet and JAWS will indicate that the headings are set.

Hey, I know - I'm lazy! But it's not a bad way to go, especially as some JAWS keystrokes of the three and four finger variety can be pretty tricky to use.

So there you go, if you've upgraded recently to JAWS V16, go into your main Office programs and give the new command search feature a spin. Until next time, have fun!

Friday, 21 August 2015

JAWS V15 - Speech History

Speech History Mode in JAWS V15

It might be stating the obvious but - JAWS speaks a lot. And yet, sometimes, in the middle of all the stream of echo consciousness, we don't always catch the nuggets we need or we simply forget what JAWS said a few minutes back. Try and recall that information in speech and it's impossible - at least it was impossible until JAWS V15 came along.

Using the Speech History Tool in JAWS V15

Since JAWS V15, you can now use a function to navigate through a history of the speech output that JAWS has spoken in the current session. If you have JAWS V15 or above, try it out:

  1. From inside MS Word for example, use the keystroke of INSERT SPACEBAR. You should hear a sharp click.
  2. Use the single letter key of "H". A virtual viewer window will eventually open.
  3. Your cursor focus should now be at the bottom of what might, potentially, be a long list. How long depends on how busy JAWS has been!
  4. Use the UP ARROW to move back through all of the speech spoken in the current session. Remember the most recent speech will be at the bottom.
  5. When you are in the virtual viewer, you can move straight to the top of the list with CONTROL HOME and move directly to the bottom of the list with CONTROL END.
  6. When you have finished reading, close the virtual viewer with ALT F4.

Pretty neat isn't it? And clearing the speech history list can be achieved in a similar fashion too:

Clearing the Current JAWS Speech History List

  1. Use INSERT SPACEBAR, you will hear a sharp click as before.
  2. Instead of H this time, use SHIFT H.
  3. JAWS will indicate that the list has been cleared.

And that is it - until next time, have fun!

Thursday, 30 July 2015

Correcting Spelling Mistakes - JAWS V15 - Quick Keys - MS Word 2007

Correcting Spelling Mistakes Using Quick Keys

Normally there's a bunch of Office or Windows keystrokes that you end up knowing off by heart and F7 - the hotkey to launch the standard spell-checker in MS Word - is certainly one of that bunch. But, did you know that you can also check for spelling mistakes in your document using JAWS quick keys? Read on.

Quick Key Mode

The JAWS quick key mode in MS Word allows you to approach a Word document in the same way that you might approach a website. So, in JAWS you can do things like tap letter H to go to the next heading in a webpage, letter E to go to the next edit field, B for next button and so on. Imagine being able to do something similar but for functions more appropriate for MS Word. In this post, I'm going to cover using quick key mode to move through any misspellings in the current document:

  1. Open a new Word document and type in a few lines of text, making sure to create some mistakes in the text!
  2. Use CONTROL HOME to move to the top of the file.
  3. Switch the JAWS quick key mode on in MS Word with INSERT Z. JAWS will echo "quick keys on".
  4. With quick key mode active, use the single letter key of "M" to move focus to the first "misspelling" in the page. JAWS will read the misspelled word, echo each individual letter and then read the line of text for the word.
  5. As the PC cursor physically moves to the location of the error it is reading you can now turn the quick key mode off (INSERT Z again) and correct the error.
  6. To move on to the next error, enter quick key mode in the usual way and press "M" again from your current position. That's it!

So, if you like working with JAWS quick keys then this might be a more appropriate route for you - especially if, for whatever reason, you just don't get on with the standard spellchecker.

Spelling as you Type Setting

Maybe you tried the above and heard the message from JAWS indicating that because "spelling as you type is disabled" the quick key option is not available. In this case, you will need to enable the "spelling as you type" option in the MS Word settings area. (This is the setting that pops a wavy red line under any spelling mistake on screen in case you're wondering.) To follow is the steps for activating/deactivating this setting in Word 2007, bear in mind that with a different version you may need to adjust them slightly:

  1. Open the Office button menu using ALT F.
  2. TAB or SHIFT TAB to the Word options button or, alternatively, tap the hotkey of "I" to launch Word options directly.
  3. Focus will be in a list of pages, such as "Popular", "Display" and "Proofing". Press DOWN ARROW to move to "Proofing" then TAB to move from the heading to the associated options. (Specifcially, initial focus will be on an "autocorrect options" button.)
  4. While you can TAB your way through the myriad checkboxes in this page, it is quicker to simply use ALT P to move focus to the "Check Spelling as you Type" checkbox directly. Use the SPACEBAR to toggle the setting on and off as required.
  5. With the option set, TAB to the OK button and use SPACEBAR to activate. You're good to go!

Until next time, have fun with quick keys!

Tuesday, 28 July 2015

Drop Down Lists in Cells - Excel 2007 - JAWS

Cell Drop Down Lists and JAWS

Something that crops up now and again at work in Excel is the issue of cell validation, how to set it up in a cell and how this works with a screenreader such as JAWS. In past times, this has been tricky to achieve, but these days it works really well.

I'm going to explain how we do this in Office 2007, I'm going to set up a cell with a specific list of choices and then we're going to run through working with that and try to mess it up and see what happens!

Set a List of Options for a Cell

Before we can check on how the cell validation works we need to have a drop down list in place so that's our first job. By the way, I'm using Excel 2007 and JAWS V15, so you may need to adjust the following steps if you're running with different versions:

  1. Open Excel 2007 and make sure you have focus in cell A1.
  2. In cell A1, type in "Do you like Marmite?" and use TAB to move to cell B1.
  3. With focus in cell B1, use the ALT key to move to the upper ribbon and then RIGHT or LEFT ARROW to move focus to the Data tab heading. Alternatively, you can use ALT A to open this tab heading straight away.
  4. Tap the DOWN ARROW to move to the lower ribbon and TAB through the commands until you have focus on the Data Validation... split button. Use the SPACEBAR to activate this button. Note: to go straight to this dialog box using the jazzy new Office keys the sequence is: ALT A, V, V.
  5. With the Data Validation dialog box in focus, press TAB to move focus to the Allow drop down (ALT A) and choose "List".
  6. When you confirm the "List" option, focus will move to the "Source:" edit field. This is where you type in the choices that you need the person inputting to pick from. In my example, I am only allowing two possible options - Yes, No. So, I type: Yes, No - into the edit field. NOTE: This is case sensitive, so you may want to input different case versions of your text. For example: "YES", "Yes" and "yes".
  7. With the options set, I TAB away and then use CONTROL TAB to move to the Error Alert page in the dialog box. This page allows you to detail what happens when the person working in Excel doesn't supply the right inputs. I have several options here that I can TAB between in the Error Alert page, these are:
    • Style (ALT Y): This allows you to choose between three icons that can be displayed: "Stop" displays a cross inside a circle, "Warning" displays an exclamation mark in a triangle and "Information" displays a lower case letter I in a circle.
    • Title (ALT T): Here you can type in the main banner heading for your message.
    • Error Message (ALT E): This text field is where you can explain, in slightly more detail, the information required.
  8. For my example, I have chosen the Warning symbol, typed in a title ("Ooops!") and some extra text to explain that I require a simple "Yes" or "No" response. With these options in place, I TAB to the OK button and use SPACEBAR. The drop down list is now in place.

Now it's time to test it out!

Access Drop Down List Options in a Specific Cell

  1. When you have focus on a cell with some validation, JAWS indicates that the cell has a "drop down list." If you miss this information, use INSERT TAB to read the current cell again.
  2. With focus on the specific cell, use ALT DOWN ARROW to expand the list.
  3. This image shows my example drop down list in cell B1 with the Yes and No options (currently unselected).
  4. Use the DOWN and UP ARROW KEYS to move through the options in the list and press the ENTER key to confirm a choice.
  5. To collapse the list without choosing, use the ESCAPE key.
  6. Double-check that your choice appears in the cell by either moving away and back again or by using INSERT TAB.

Testing the Validation

But let's cut to the chase - what if you ignore the drop down list options and try and type your own entry? Well, this is where your "Error Alert" should kick in and do the business for us. In theory, you should have a message box with your text in it so let's test this out:

  1. With focus on the cell containing the drop down list, instead of choosing from the drop down list I ignore it entirely and type in the word "food" and use the ENTER key.
  2. Immediately, Excel pipes up with a warning message containing my Title and Error Message text. JAWS reads this information but if I miss it I can always re-read the dialog box contents with INSERT B.
  3. The error message dialog box also gives me several button options in response to how I want to proceed. Of particular importance is the "No" button, which is in focus by default, and the "Yes" button. If I decide to choose "No" then my input is cancelled and I return to the spreadsheet. If I choose "Yes" however, my manual input is accepted even though it doesn't meet my criteria.
  4. In this case, I choose the "No" button - I mean, the author of the worksheet has put cell validation in for a reason after all!

And there you go - cell validation working neatly in Office 2007 with JAWS. I should also add that it's good form to embed some comments in the worksheet for anyone using a screenreader to alert him/her to the use of drop down lists. For example, if you have a column of drop-down lists, you might want to pop a comment in the cell with the column heading to give the person inputting the data a bit of a heads-up. (I covered Comments in Excel a while ago on this blog, if you need a refresh then have another read through.

Until next time - have fun!

Wednesday, 15 July 2015

Zoomtext Camera Feature - Webcam - CCTV

Camera Fun with Zoomtext V10

In this post I'm going to cover one of the more recently introduced features in Zoomtext. Providing you have V10 or over you may have noticed some of the new features situated in the Tools menu (ALT T). If you have the “Magnifier only” version of Zoomtext you'll find two items in the Tools menu, namely “Camera...” and “Launch Camera”. But if you have the full “Magnifier and Reader” installation then you'll find another few items such as the Text Recorder and Background Reader - in fact, I covered the latter in a post a while back here. In this post though I want to play with the camera feature and see if my old webcam can be given a new lease of life.

This image shows the Tools page of the main Zoomtext user interface, the camera section of the toolbar has a Full and Docked button.

So, what's the deal here? Well, the basic idea is that if you have a semi-decent USB webcam (or, in my case, a really old poor quality USB webcam) you can drive this camera from inside Zoomtext and treat it like a portable CCTV. No great shakes there you might be thinking, until you recall the sobering fact that most CCTVs have a wince-inducing price tag! So, while you don't get all the bells and whistles of a top-flight CCTV, you do get some basic, functional CCTV ability. Additionally, if you are running on a laptop, you can factor in the portability of the solution too. Not bad, considering you have the Zoomtext software and the webcam already anyway.

Setting Up the Webcam

  1. Plug in your USB webcam, if it isn’t already attached to your PC.
  2. Ensure that your webcam is placed on a stand, or at the very least is suitably supported to enable you to focus appropriately on an example printed page.
  3. Access the Tools menu (ALT T) in the main Zoomtext user interface and choose the Camera... option. 
    This images shows the Camera dialog box, the main settings area for the camera feature.
  4. In the Camera dialog box use the TAB key to move around the options. Notice the Active Camera field - this should contain the name of the camera you are using - although, if you have more than one camera, then you will need to select the correct device here.
  5. Also, notice that you can set the View Mode for the current Camera, choosing between a "Full Screen" or a "Docked Screen" style of view. If you choose the latter then you can Dock the camera view to the top, bottom, left or right hand half of the screen by default.
  6. When you have finished exploring, set the options in the dialog box as required and use TAB to move to the OK button. Use the SPACEBAR to confirm and close the dialog box.

Toggle the Camera On and Off

Now that you have run through the main Camera settings dialog box the final step is to launch the camera. You can do this by either:

  • Opening the Tools menu as before and choosing one of the camera views from the Launch Camera submenu.
  • Activating the Launch Camera button in the Camera… dialog box via the Tools menu.
  • Pressing the keystroke of ALT WINDOWS M, this toggles the camera display on and off.

Now that you can launch the camera function, grab a page of printed text and place it in the range of the webcam.

Using the Webcam to Read Text

Just how much control you can have over your webcam through Zoomtext really depends on the camera hardware itself. For example, the webcam I have is a simple fixed focus affair so I have to manually move it to an optimal distance away from the material I want to read - in my case around 17-18 centimetres away.

If you have a manual focus webcam then you can make focusing adjustments via the Focus option in the Camera toolbar or by using the following keystrokes:

  • Manually Focus In: CONTROL WINDOWS RIGHT ARROW
  • Manually Focus Out: CONTROL WINDOWS LEFT

With some suitable material in place, you can now change a few settings to suit your requirements.

Keyboard Control of the Camera

As you might expect, there's a whole bunch of keystrokes that can be used to switch between the different modes of operation and to alter various settings.

IMage showing the Camera toolbar that appears when you are in a docked view with the camer feature active. This toolbar gives you quick mouse access to options such as colour, docked/full and zooming in and out.

First, you can choose between running in Full Screen Mode (which will also remove the specific Camera Toolbar from the screen) and a half-screen Docked View (where the specific Camera Toolbar is available). You control these display options with the following hotkeys:

  • Toggle Full Screen and Split View: ALT WINDOWS V
  • Cycle through Split View Settings: ALT WINDOWS S

Depending on the material you are trying to read and the position of your webcam, you may also need to rotate the display. This will work whether you are in "full" or "split" screen modes:

  • Rotate camera screen (full and split views): ALT WINDOWS R

On most CCTV systems you have various colour and clarity options that you can choose from to increase contrast levels. The settings here are no different, with a bunch of colour schemes that you can cycle through and choose from. Also, when you have set your preferred colour scheme, you can choose to customise the brightness and contrast levels as required. Doing this gives you complete control over the clarity of the image and can be the difference between reading something comfortably - or not!

  • Toggle the Colour Scheme View On and Off: ALT WINDOWS SPACEBAR
  • Cycle through available Colour Schemes: ALT WINDOWS C
  • Decrease image brightness: ALT WINDOWS UP ARROW
  • Decrease image contrast: ALT CONTROL WINDOWS DOWN ARROW
  • Increase image brightness: ALT WINDOWS DOWN ARROW
  • Increase image contrast: ALT CONTROL WINDOWS UP ARROW
  • Reset to the default clarity settings: ALT WINDOWS B

An Example Scenario

In this example, I want to use my webcam to read some text on a bottle label. I will use the black and yellow colour scheme and manually set the contrast levels to enable an easier read. Let's go:

  1. Connect the USB camera.
  2. Position the camera and the material to be read on a suitable surface - obviously, I will have to move both around in due course.
  3. In Zoomtext, turn the camera mode on with ALT WINDOWS M.
  4. I'm in one of the split views to begin with which is fine, so now I cycle through the colour schemes (ALT WINDOWS C) to get to black and yellow.
  5. At this point I move the bottle a little bit so that it appears sharper. I also increase the contrast with ALT CONTROL WINDOWS UP ARROW.
  6. Now I zoom in slightly to focus more on the text using ALT WINDOWS NUMBERPAD PLUS.
  7. After a few more manual adjustments of moving the bottle (the ambient lighting is not balanced on all sides so I have to move it around) I switch to full camera view (ALT WINDOWS ) and read the text.
  8. With the job done, I set it back to split view (ALT WINDOWS V) and reset my clarity changes back to their defaults with ALT WINDOWS B.
  9. Finally, I turn the colour schemes off with ALT WINDOWS SPACEBAR then turn the camera feature feature off completely with ALT WINDOWS M.

And there you go! A pretty nifty feature - especially if you have a semi-decent webcam kicking around in the back of a drawer in the first place. But, either way, it's definitely worth taking some time out to experiment with it. Until next time, have fun!

Friday, 3 July 2015

Managing Key Labels - JAWS V15

Amending Key Label Settings with JAWS V15

When you start out using a screenreader you tend to hang on every word or every bit of "echo" the software provides. But, over time, you start to focus on the audio cues you actually need. In fact, the mission with your screenreader soon becomes one of paring down all that beginner level verbosity which can, ultimately, get really irritating.

A valuable option in trying to personalise the JAWS echo is to manage the labels spoken for some of the keys on your keyboard. As you know, when you use certain keys on the keyboard, JAWS will indicate the key you have pressed. But what is often under-acknowledged is that you have some control over how JAWS is doing this - in fact, over whether JAWS speaks at all!

To give you an idea of how JAWS can control this type of key label echo, I am going to walk through how to both mute the echo completely and also how to change the label to a text string of your own choosing. (So, if you always wanted to have a TAB KEY echo "Gerald" every time you press it, then read on!)

Toggle Key Label Speech On and Off

  1. With JAWS running, use the keystroke of INSERT F2 to open the Run JAWS Manager list box.
  2. Use the letter S several times to quickly move to the Settings Centre item in the list and use ENTER.
  3. Press CONTROL SHIFT D to open the Default Configuration file in the Settings Centre dialog box.
  4. In the Search field (CONTROL E) type in the word "Manage" then DOWN ARROW to focus on "Manage Key Labels..." Press ENTER.
  5. Focus will now be on "Manage Key Labels..." in the formal tree view of settings, so tap F6 to move and focus on the "Manage Key Labels button..." Use SPACEBAR to activate this.
  6. The Manage Key labels dialog box will now open and your focus will be in a list view, each row containing three columns of information. Use the DOWN ARROW to move through the options and listen to the feedback for each item.
  7. This image shows the Manage Key Labels dialog box in JAWS V15. There are three columns of information: Key Name, Key Label and Mute.
  8. The three columns of information for each item in the list is as follows:
    • Key Name: This is the name of the key on the keyboard.
    • Key Label: This is the text label spoken when the key is used.
    • Mute Status: This piece of information shows whether the label is spoken or not. NOTE: if the text is "Always Speak" then you are unable to mute that key.
  9. With focus in the list, press the letter "T" to move to the "Tab" key entry in the list. Notice that "Tab" is set to "Speak" and the key label is "Tab".
  10. Use the ALT T keystroke to toggle the Mute Status on and off - in this case, set it to "mute".
  11. Use INSERT UP ARROW to conduct a final read across the columns for the Tab key and ensure that the Mute setting is active.
  12. Press the TAB key to move to the OK button and use SPACEBAR to confirm.
  13. Focus will move back to the Manage Key Labels... button so tap the F6 key to return to the tree view, then TAB to the OK button. Use the SPACEBAR to confirm and activate your configuration change.

Now go into a new document (or navigate around something like the CONTROL P Print File Dialog box) in MS Word and test out your new silent TAB key!

Customise Key Label Speech

But what if you want to change the text that is spoken rather than turn the text off completely? In this example I'm going to change the echo speech "Num Lock" into "Number Lock".

  1. Follow the steps as previous to navigate through the Settings Centre, choosing the default file and Manage Key Labels dialog box.
  2. Locate the "Num Lock" item in the list.
  3. This time, use the keystroke of ALT C to activate the Change Label button.
  4. Focus moves to an edit field, replace "Num Lock" with "Number Lock".
  5. Press the TAB key to move to the OK button and use SPACEBAR to confirm.
  6. As before, use the F6 key to move to the tree view then TAB to OK and confirm with SPACEBAR.

Now test out your new key label for Number Lock! I've never been keen on the "num lock" echo which sounds like a wrestling move to me. Anyway, until next time, have fun!

Tuesday, 16 June 2015

Selecting, Copying and Pasting with VoiceOver - iOS

Selecting, Copying and Pasting Text with VoiceOver on iOS

A task that doesn't always feel particularly intuitive at first for newcomers to VoiceOver on iOS is how to work with and manipulate text. Even basic tasks such as copying and pasting can, at first, be a minefield. What can make this even more frustrating is that these "tricky" situations crop up when you least want them to - suddenly, you are faced with figuring out how to include a URL in an email or how to copy that bit of text in a website. And while general navigation with VoiceOver is relatively straightforward (after a bit of "play time" anyway) text manipulation with VoiceOver requires a bit more structure and insight.

In this post I'm going to go through some of the steps that you can take to achieve these tasks. My ultimate aim here is to get you confidently copying and pasting text so we're going to explore every bit of the overall process individually. Let's get started...

Text Fields and Insertion Points

Before you begin copying and pasting text, you need to understand exactly how to approach working in a standard text field and the general approach to selecting specific characters and/or words. First thing, we need to talk about insertion points:

  1. Navigate to the standard Notes app on your iOS device. DOUBLE TAP to launch the app.
  2. In the Notes app, DOUBLE TAP the Compose button and SWIPE RIGHT to the "Note text field, is editing" area.
  3. Type or dictate some basic text into this area.
  4. When you have some text in place, use a SINGLE FINGER DOUBLE TAP - notice that VoiceOver indicates "insertion point at start". Use the same gesture again, to move the insertion point to the end.

Being able to control the insertion point in this way allows you to start your text operations from a more convenient situation. Always bear this positioning ability in mind prior to any text manipulation you need to do. Okay, on to the next step...

Using the Rotor: Characters and Words

The key to having fine control at the text level is all via the rotor. You are going to be accessing it a lot for your text actions so, if you find the rotor gesture difficult or unwieldy to use, keep practicing until it becomes easier.

  1. In your text edit area, move the insertion point to the start of your text, if you are not already there.
  2. Use the rotor gesture to select the Characters option.
  3. With the Characters rotor option set, use a ONE FINGER FLICK DOWN gesture. You should hear VoiceOver move the cursor and echo the next character that takes focus.
  4. After you are comfortable with the ONE FINGER FLICK DOWN gesture, use a ONE FINGER FLICK UP to move backwards through the characters.
  5. Now use the rotor control again and set the Words option.
  6. With the Words rotor option set, use the ONE FINGER FLICK DOWN gesture as before and this time you should hear VoiceOver move the cursor and echo the next word.
  7. When you are happy with moving through the words, use a ONE FINGER FLICK UP gesture to move backwards through the previous words.

Now practice each different mode, switching the rotor control between "Words" and "Characters" as required and using the SINGLE FINGER FLICK UP and DOWN gestures to move focus.

When you have played with these gestures for a while, ensure the rotor control is set to "Characters" in preparation for our next step.

Select Text in a Note

Now that you can move the insertion point to the beginning and end of the current text area and change the rotor between "words" and "characters", it is time to explore selecting:

  1. With your "Characters" rotor option set, use a SINGLE FINGER FLICK DOWN gesture to move through the individual characters in your text. Move to a word that you want to copy and focus the cursor on the first letter.
  2. NOTE: A little technique I use when I SINGLE FINGER FLICK DOWN is to overshoot the first letter of the word I want to copy and then SINGLE FINGER FLICK UP to go one character back. This extra FLICK DOWN and FLICK UP results in the cursor being positioned to the left hand side of the character, a starting point that makes selecting the text feel more intuitive to me. I do this extra flicking to give me the confidence that I definitely have focus on the right letter when I start to highlight.

  3. Now use the REVERSE PINCH gesture to perform the highlighting move from the cursor position. (This REVERSE PINCH gesture can be tricky, imagine stretching an elastic band between two fingers on the screen.) As you drag across the screen, the text will be highlighted and the individual characters will be spoken. (Remember: you are in Characters mode.)
  4. If you over-shoot with your highlighting selection, then use the PINCH gesture to reduce the highlighting from right to left. Again, VoiceOver will comment as you go about this.
  5. Practice both of these PINCH gestures until they become second nature and you can confidently select text. Also, switch to the Words rotor option and test out the PINCH gestures with words.

Copy and Paste into a New Note

Now that you can move the insertion point around, switch between word and character movement and select text, it is time to venture into the Editing options available via the rotor:

  1. With any relevant text highlighted, use the rotor to select the Edit option. Now SINGLE FINGER SWIPE UP or DOWN to confirm the Copy setting. DOUBLE TAP to activate and perform this copy operation, VoiceOver will indicate "(your words here) copied" if you are successful.
  2. With the selection now copied to the clipboard, SWIPE LEFT to reach the Compose button and DOUBLE TAP to create a new note.
  3. SWIPE RIGHT to the text edit area of the new note and access the rotor control area once again. Choose the Edit rotor option as before and this time around SWIPE UP or DOWN to select the Paste option. As before, DOUBLE TAP to confirm and paste the text in at the insertion point.
  4. If necessary, switch the rotor mode back to "Word" or "Characters" and carry on working.

And that's it - copying and pasting VoiceOver and touchscreen style! A bit on the fiddly side I'm sure you will agree but once you get the hang of switching between all the relevant rotor options and the PINCH and REVERSE PINCH gestures, it will start to feel more fluid.

Now that you are getting to grips with this, it's time for a challenge - just how do you go about copying that URL and pasting it into a file or email?

Until next time, keep those rotors spinning...