Tuesday 23 December 2014

Constraining the Mouse Pointer - Zoomtext V10 - Keyboard

Constraining Mouse Movement in Zoomtext V10

Something I have always found irritating when working with text in a magnified environment is the free movement of the mouse. Often I want to move with the mouse along a straight X or Y axis but, instead of a straight line path, the free roam of the mouse tends to lead me all over the place. Nowhere is this more apparent than when I open a drop down menu, that meandering effect can be really frustrating!

Image showing the checked pointer constraint option in the Mouse page of the Navigation Settings dialog box.

Thankfully, Zoomtext has a checkbox setting that allows me to avoid this and force the mouse pointer into a straight line. This is how it works:

  1. Switch focus to the Zoomtext window. You can use the keystroke of CONTROL SHIFT U to move directly to the Zoomtext user interface.
  2. Tap the ALT key to move to the main Menu Bar and navigate to the Settings menu.
  3. Open the Settings menu with the DOWN ARROW or ENTER key.
  4. With the Settings menu open, press the DOWN ARROW to move to the Mouse... item.
  5. Focus will now be on the Mouse page of the Navigation Settings dialog box. Press the TAB key to move to the checkbox labelled "Hold the SHIFT key to move only horizontally or vertically". Press the SPACEBAR to check this checkbox.
  6. Press the TAB key to move to the OK button and press the SPACEBAR to confirm.

Now that the setting is active it is time to test it out! Open a menu for example then hold the SHIFT key down before you start to navigate. Notice how the mouse pointer moves in a rigid vertical line for as long as you hold the SHIFT key - instead of it meandering around unrestricted when you try to navigate. Pretty neat!

Thursday 18 December 2014

Excel 2007 - Keystrokes - Applying a Basic Filter

Applying a One Column Single Match Filter in Excel Using Keystrokes

We normally associate Excel spreadsheets with columns and rows of numerical data but for a lot of people Excel is used to capture other text-based stuff, such as the output from surveys or even contact information. Now, I don't want to open the can of worms argument about whether a single Excel spreadsheet is the right or wrong place to store data like that but, the fact is, it happens a lot. And when you collate data like this in Excel, you're really going to want to know at least a little bit about filtering.

What is a Filter?

You'll probably hear about sorting and filtering at some point if you go anywhere near Excel. The basic difference between the two is that while sorting will reorder your data, filtering can actually hide data that doesn't meet the conditions you've specified. So, filtering is much more useful when you need to narrow down your data and work on a smaller set of information.

Let's run through an example but first we need to have some data to work with. I am going to use the following details in Excel and I have popped a few of the cell references in the heading cells so you can understand where the data sits in the spreadsheet. However, there really isn't much choice here because, when you are working with data lists, your heading row should always be in row 1, with your data starting immediately in row 2.

Have a bash at recreating my example data below in Excel. Alternatively, choose one of your own files or create your own set of data to use:

Surname (A1)City (B1)Type (C1)Books (D1)Reference (E1)
Wilson (A2)Birmingham (B2)Mail (C2)2 (D2)A1 (E2)
Smith (A3)Glasgow (B3)Email (C3)5 (D3)A3 (E3)
JordanLondonMail1A1
FranksGlasgowEmail4A2
DaltonLondonMail2A3
JamesBirminghamEmail5A2
BartonLondonMail4A3
FultonGlasgowEmail3A2
HarrisBirminghamMail4A1
SimonsNewcastleMail3A1
FerrisBirminghamEmail5A2
TaylorNewcastleEmail4A3
FrancisGlasgowMail2A2

Now that we have our data let's play with some filters in Excel.

Applying a One Column Single Match Filter in Excel

As I mentioned earlier, the whole point behind filtering is to hide the data that doesn't match the specific criteria you have set. In our example data table, I might want to filter out all of the data that doesn't match a specific city, or match a specific mail type or even filter out the Book column where the values are less than a specific amount. Let's go through applying a filter using the City column:

  1. Tap the ALT key to move the focus to the upper ribbon in Excel.
  2. ARROW RIGHT to the Data tab then DOWN ARROW to the lower ribbon.
  3. Press the TAB key to move focus eventually into the Sort and Filter Toolbar. Keep pressing TAB until you have focus on the Filter button, which will currently be inactive.
  4. With focus on the Filter button, press the SPACEBAR to activate it.
  5. NOTE: When you activate the Filter button it places a small clickable arrow graphic in the bottom right corner of each cell in the title row. This is a small visual indication that the filter feature is currently active and these drop down menus can be accessed for each cell using ALT DOWN ARROW.

  6. When you apply the Filter feature, the keyboard focus will return to the worksheet area. Use the ARROW KEYS as necessary to move to cell B1 and open the drop down menu for the title cell using ALT DOWN ARROW.
  7. DOWN ARROW through the drop down menu and you will eventually arrive at a tree view object labelled Select All, which will be checked. Use your SPACEBAR to uncheck this item and, when you do this, all the other checkboxes in the tree view are automatically unchecked too.
  8. Now DOWN ARROW again and move through the other options - notice how all of the individual Cities are available for you to choose from.
  9. Pick a city by tapping your SPACEBAR to check the relevant box.
  10. After you have checked one of the options then press the TAB key to move to the OK button and press the SPACEBAR to confirm.
  11. Focus returns to the worksheet but this time you should notice some differences. If you are using a screenreader for example you will notice that the cell references suddenly make no sense and that is because a portion of the data is now hidden from view. Similarly, on visual read through of the data, a potentially huge chunk will now be missing. In my case, filtering on the one city, I only have two rows remaining in the Worksheet that match "Newcastle".

Well done! Your filter is set and active.

Turning the Filter Feature On and Off

Generally you have two options here, these are:

Turn the Filter Feature Off Completely

  1. Tap the ALT key to move the focus to the upper ribbon in Excel.
  2. ARROW RIGHT to the Data tab then DOWN ARROW to the lower ribbon.
  3. Press the TAB key to move focus to the Filter button - which will be enabled - and press the SPACEBAR to deactivate it. The Filter feature is now completely disabled and your data is back to normal.

Leave the Filter Feature Active But Display All Data

  1. Move to the cell column title that you are currently filtering by and access the drop down with ALT DOWN ARROW.
  2. Keep pressing the DOWN ARROW until you have focus on the tree view section as before, specifically the Select All option. Use the SPACEBAR to check this.
  3. With focus on the Select All checkbox, press the SPACEBAR to check it.
  4. Press the TAB key to move focus to the OK button and press SPACEBAR again to confirm.
  5. Focus will now return to your worksheet with all the data revealed again although the filter feature itself is still active.

So there you go, a one column, single match filter. In a future post we will take the filtering on a bit further and look at multiple columns, working with the filtered data in the worksheet and applying some custom text filters. Have fun!

Thursday 4 December 2014

Accessing Further Actions for Messages Posted in Facebook - VoiceOver

Facebook App: Opening the Actions Menu for a Message Post

A topic that crops up for many new users of the Facebook app on iOS is how to interact with a message post - such as how to edit or even delete a post you've just made.

Now, there are actually some different approaches you can take but the easiest and most common route to achieve these kinds of tasks is to use the Actions Menu. This is how it works:

  1. Locate a message post that you have created in Facebook or, alternatively, post something to your timeline that you can use to play with.
  2. Focus on this post using the ONE FINGER SCANNING technique or by SWIPING LEFT or RIGHT as necessary.
  3. With the post in focus, use the TWO FINGER TAP gesture and you should hear VoiceOver say "alert, choose an action." This indicates that the main Action Menu is open.
  4. SWIPE RIGHT and move through the options in the menu. Although the options will vary depending on context, you should find items such as: Like, Comment and More.
  5. Focus on the More menu option and DOUBLE TAP to activate.
  6. Focus will now move to the additional options allowing you to choose from further actions, such as Edit and Delete. Choose as necessary and you're done!

Remember that you can also use the main links for liking and commenting on a post if you find the Actions Menu tricky to use.

Have fun!

Wednesday 3 December 2014

Abbreviations - JAWS V15 - Dictionary Manager

Expanding Abbreviations Using the JAWS Dictionary Manager

The language of the Web can often be a bewildering place, where sometimes obscure abbreviations litter the most seemingly normal of conversations. TBH and AFAIK PPL have their favourite slang terms and, FWIW, there is an expectation that others understand what is being said. For sure, these are the days of knowing your HTH from your IDK and your TYVM from your YOLO. LOL. (Okay, I'm sure you've got the message...)

The reality for many of us is very different! When it comes to reading text with JAWS, these kinds of abbreviations can often be a real PITA. And not just slang, the whole tech world vocabulary hangs on abbreviations. Thankfully though, we can use the Dictionary Manager to make things more palatable by expanding these often obscure abbreviations. Doing this means that when JAWS encounters an abbreviation - LOL for instance - the screenreader actually reads out "laugh out loud".

This screengrab shows the JAWS Dictionary Manager dialog box, which contains the fields where you can specify a word and then completely change the way the screenreader pronounces it.

Before we can achieve this though, you need to supply the new phonetics for the Dictionary Manager. Let's run through how this is done now:

  1. Open the Dictionary Manager using the keystroke of INSERT D. Alternatively, access the Dictionary Manager via the Run JAWS Manager listbox which you can launch via the keystroke of INSERT F2.
  2. With the Dictionary Manager open, press CONTROL SHIFT D to open the main default JDF settings. While you can create individual dictionary files per application, it makes more sense to have the pronunciations all stored as defaults so they are used across all applications.
  3. Use the TAB key to move around the main options in the dialog box, notice the Add button, Delete button and the main treeview.
  4. When you have finished exploring, activate the Add button by either focusing on it and using SPACEBAR or using the hotkey of ALT A.
  5. Focus now moves to the Actual Word edit field in the Add Dictionary Definition dialog box. This is where you type in the word that requires a different pronunciation. In my case, I want to change how JAWS reads the Web slang AFAIK, so I type afaik into the edit field and press TAB to move on.
  6. Focus now moves to the Replacement Word edit field and in here I type in the full phonetic text for AFAIK which is As Far As I Know. Remember that this field is concerned with appropriate phonetics - not to be confused with correct spelling - so, use capital letters and additional letters to create a correct pronunciation. For example, with AFAIK I could also type the replacement words as follows: As Far As I No.
  7. From the Replacement Word edit field press the TAB key to move all the way to the Applies To Language combo box - ignore the different Play Sound options for now, we will revisit and play with those in a future post. In the Applies To language combo box make sure it is set to the default of "All Languages."
  8. Press TAB once more to move focus to the Speak Replacement Word Using Language combo box and check that this is set to Default.
  9. Press TAB again and move past the Case Sensitive checkbox - leave this unchecked - to focus on the OK button. Press the SPACEBAR to confirm your entry and close the dialog box.
  10. Focus will now return to the main Dictionary Manager dialog box so tap the ALT key and open the File menu. Press the DOWN ARROW until you hear Save and use ENTER to activate this. When you have saved the file, press ALT F4 to close the Dictionary Manager dialog box completely.

Now give it a bash! Open a new document in MS Word and type some text in that contains AFAIK. On read through, JAWS will now repeat your new text and not simply read a string of letters!

This is only the tip of the iceberg in terms of what the Dictionary Manager is capable of but I hope it is enough to get you experimenting!

Have fun!

For more information on JAWS visit: www.freedomscientific.com

Tuesday 2 December 2014

Autotext - Building Blocks - NVDA - Keyboard - Office 2007

Creating a Simple Text Building Block in MS Word 2007

One of my favourite all-time features in MS Word is autotext and I use it extensively to store chunks of text I need to repeat in my documents. Using autotext means that I can avoid having to either manually type in all the text again from scratch (and redo any necessary formatting) or avoid the other manual option of locating the text in another document and then copying pasting into the new one. In short, autotext saves me a fair bit of time and lets me avoid a few hassles - which is always good.

In Word 2007 and above the older standalone autotext feature now finds residence in the general Quick Parts functionality available via the Insert tab. Let's run through a basic example here such as a standard sign-off with a few contact details so that you can get a feel for how this feature works. I've got NVDA running as I do this but any reasonably competent modern screenreader should be fine with this:

Save Text as an Autotext Building Block

First thing we need to do is get some content in the document so launch MS Word 2007 then do the following:

  1. Press ENTER a couple of times to introduce two blank paragraphs into the document.
  2. Now imagine that you are creating a standard signing-off section that contains a few pieces of contact information - though whether you make this real or fictitious is entirely up to you. Type in details such as: your name, job title, telephone number and an example web address. I have typed in the following example text:
  3. Mr P. K. Small
    Senior Gobstopper Chef
    Telephone: 566 878787
    URL: http://www.funnysmilesweets.com
  4. Format the text as necessary: change the fonts, change the size of some of the text, change the style of the text, change the alignments and so on. In my example I have kept everything left-aligned and the same size but I have applied some "bold" styling to my name text.
  5. Carefully select all of the text in the page using the SHIFT and ARROW KEY method. Remember that you can also include the two blank paragraphs if you wish.
  6. Check your selection if necessary. Within NVDA use INSERT SHIFT UP ARROW to check a selection, with JAWS use INSERT SHIFT DOWN ARROW).
  7. When you have confirmed the selection, press ALT F3. Focus will move to the Name: edit field in the Create New Building Block dialog box.
  8. This image shows the standard Create New Building Block Dialog Box, containing the Name, Gallery, category, description, Save In and Options fields.
  9. The Name edit field is important. Whatever you input here is the name you will type into your document when you need to recall the autotext. So, make the name something concise and meaningful - not a cryptic name (you may forget it) or a long, long string of text either (the whole point of autotext is to save time...) In my example, I have changed the default text supplied in favour of a more appropriate name: "signoff".
  10. Pressing TAB from the Name edit field moves the focus to the Gallery combo box. A gallery is a particular storage category for the building block you are creating - in this case here we are creating autotext so it makes the most sense to save the text in that specific gallery.
  11. The next field is labelled Category and you have the option here of using the supplied category of General or creating your own category. In this example, the General category is fine so ensure this is selected and TAB on to the next field.
  12. The Description multi line edit field is next. Although this is optional it is useful to have some level of description in here for the text you are storing, especially if you plan on creating a lot of these building blocks.
  13. Pressing TAB once more moves the focus to the Save In: combo box. Here you have two main options for where you want your new autotext to be physically stored. In most cases, the default setting of Building Blocks.dotx should be fine although you may want to store everything in your Normal.dotm template. Generally though I advise against this as it creates a single point of failure - your Normal template tends to be where you have all your Style and macro information embedded as well.
  14. Pressing TAB moves the focus to the final field in the dialog box labelled Options. This combo box contains a choice of three items that determine how your autotext is pasted back into the document. The available options are:
    • Insert Content Only
    • Insert Content in its Own Paragraph
    • Insert Content in its Own Page
    Choose as necessary then TAB to the OK button and press SPACEBAR. Your autotext is ready to roll!

Accessing and Pasting Your Autotext

Now that you have some custom autotext stored and ready to use, let's give it a test run in a new document:

  1. Create a new document in MS Word.
  2. Type in a few sentences and move to a blank line.
  3. Type in the first few letters of the name of the autotext you have just created. (In my example the name I supplied was "signoff" - so I type signoff into the page.)
  4. Immediately after you have typed your chosen autotext name - or the first few letters of it - press the F3 key.
  5. When you tap F3, providing the name of your autotext is correctly recognised, you should find that the full stored autotext is automatically inserted at the cursor.
  6. Check your autotext and correct any line spacing if necessary. Notice that the autotext is inserted based on the settings you supplied in the Options combo box - so if you chose to insert the text in a new page you should now have a two page document.
  7. That's all there is to it! How cool is that? Now you might want to explore whether putting your galleries in the quick access toolbar is a good idea...

That's it for now - have fun!

For more information on NVDA please visit: www.nvaccess.org

Friday 28 November 2014

Changing Rows and Columns of Data - Excel 2007 - Using the Keyboard

Changing Excel Rows to Columns and Columns to Rows

Here is a nice simple one for a Friday! Have you ever arranged a set of figures into a column in Excel only to realise that you would have been better off typing them as a row of figures? Well here's a neat thing - you can copy and paste data in columns to rows and vice versa, you don't have to retype it all...

Change a Column of Data to a Row of Data

  1. Locate the column of cells you want to copy and select them using the SHIFT ARROW key method. Alternatively, if you want to select the whole column press the keystroke of CONTROL SPACEBAR.
  2. Copy your selection to the clipboard using CONTROL C.
  3. Move the cursor to the first cell in the destination row you want to paste to.
  4. Press the ALT key to move to the upper ribbon then use the LEFT and RIGHT ARROW keys as necessary to ensure you have focus on the Home tab.
  5. Press the DOWN ARROW to move to the lower ribbon and focus on the Paste button.
  6. Press the SPACEBAR to open the Paste drop down menu and press the DOWN ARROW to highlight Paste Special... Press ENTER
  7. In the Paste Special... dialog box use the TAB key to move the cursor to the Transpose checkbox. Press SPACEBAR to tick the checkbox.
  8. Focus now returns to your worksheet - notice that your data is now pasted in as a row!

Change a Row of Data to a Column of Data

  1. Navigate to the row of cells you want to copy and select them using the SHIFT ARROW key method. Alternatively, if you want to select the whole row press the keystroke of SHIFT SPACEBAR.
  2. Copy your selection to the clipboard using CONTROL C.
  3. Move the cursor to the first cell in the destination column you want to paste to.
  4. Press the ALT key to move to the upper ribbon then use the LEFT and RIGHT ARROW keys as necessary to ensure you have focus on the Home tab.
  5. Press the DOWN ARROW to move to the lower ribbon and focus on the Paste button.
  6. Press the SPACEBAR to open the Paste drop down menu and press the DOWN ARROW to highlight Paste Special... Press ENTER
  7. In the Paste Special... dialog box use the TAB key to move the cursor to the Transpose checkbox. Press SPACEBAR to tick the checkbox.
  8. Focus now returns to your worksheet - notice that your data is now pasted in as a column!

NOTE: You don't need to navigate to Paste Special... in the ribbon, you can also access it from the right hand applications/context menu. Just tap the RIGHT HAND WINDOWS key or use SHIFT F10 instead and access Paste Special... from in there.

Pretty neat and potentially a real time saver - in fact, we'll be returning to some of the other Paste Special options in future posts.

Have fun!

Thursday 27 November 2014

Facebook Status Updates - VoiceOver - iOS V8.1 - JAWS V15 - Internet Explorer

Posting Facebook Status Updates Using JAWS and VoiceOver

I've been spending a bit of time working with JAWS V15, Internet Explorer V11 and Facebook recently and I want to share my Status Update approaches here. I'm no expert in this social media area so I can't say that my routes through these tasks are generally accepted but they do work for the versions I am using here. As you will tell from the steps, it brings home a certain reality for a lot of AT users these days - that the app approach (given a level of accessibility there) is just so much less work in terms of pure cognition.

By the way, these steps assume that you have already logged in and that your account is functioning normally. First up is JAWS, running in the full-fat Facebook.com environment:

Post a Status Update (JAWS and Internet Explorer)

  1. Move to your Timeline page, using the built-in Facebook keystroke of ALT 2 (if you are using Mozilla Firefox you will need to use ALT SHIFT 2). If this keystroke does not work as expected then navigate manually to the "Your Name" link via your JAWS links list (INSERT F7)
  2. Focus will now move to your Timeline page, you can confirm this with INSERT T, the title bar of the page should contain your Facebook account name.
  3. Move to the Update Status edit field (labelled "What's on your mind?") in one of the following ways:
    • Tap the E key to move to the appropriate edit field. ("What's on your mind?")
    • Access the JAWS list of form fields with INSERT F5.
    Depending on how you have located the "what's on your mind?" edit field you will either be in Forms Mode already (if you used Insert F5) or you will need to launch it manually (if you used the E quick key). If you need to manually enter Forms Mode, make sure you are focused on the edit area and press ENTER - you should hear a kind of popping sound.

    NOTE: In a web page, if you are ever unsure what mode you are currently in then use the JAWS keystroke key of ALT DELETE.

  4. Now that you are in the edit field and in Forms Mode you can input your status update text...
  5. When you have input your text use the TAB key to step out of the edit field. Back in virtual cursor mode, continue to press TAB until you have focus on what will either be a "friends button menu" or a "public button menu."
  6. IMPORTANT: When JAWS reaches this button, the label actually indicates who can see the status update you have just written. Therefore, if you want to post for your friends only and no-one else - and JAWS announces "friends button menu" - you do not need to change anything as the appropriate level is already set by default.

  7. If you do need to adjust this button to change the setting, you have three choices (although one of these "only me" is hardly entering into the spirit of social communications). Tap the SPACEBAR to open the menu and use the DOWN ARROW to move through the options. The two obvious choices are: "Public" (everyone can see it, friends or not) and "Friends" (only people in your friends list are permitted to read it). Choose appropriately at this point and press the SPACEBAR to confirm.
  8. NOTE: If you really do need to use the "Only Me" option for your post(s) then you will have to activate the "More Options" item before it becomes available in the menu for you to choose.

  9. If you have set a different level to the default you may find that your focus has jumped away to a completely different area in the page. If so, retrace your steps to the button using INSERT F5 to find the "Your Friends" button. When you have refocused, press the TAB key to move to the Post button and use the SPACEBAR to press it and send your post to your Timeline.
  10. NOTE: When you are working the Facebook pages remember that they are often updated dynamically so JAWS, which is reading buffered code off-screen, may not be entirely up-to-date as a result. As a precaution, if you think something has gone awry or you are not hearing the options you expect to hear, refresh the screen with INSERT ESCAPE. Remember that you can also reload the entire page itself with F5, although you run the risk of losing any content you are halfway through when you do this so be careful.

Okay, that all probably sounded a bit more complex than it needed to be! But your message should now be posted to your own timeline and of course it will appear in your friends newsfeed.

Post a Status Update (VoiceOver and the Facebook app)

Taking a different route in now, this is how you go about achieving the same thing using the built-in iOS screenreader VoiceOver:

  1. Use the ONE FINGER SCAN technique to locate the Main Menu button in the top left of the screen. DOUBLE TAP to open this menu.
  2. SWIPE RIGHT or ONE FINGER SCAN down the open menu and focus on the "Your Name Here" option. DOUBLE TAP this to move focus to your own status updates page.
  3. SWIPE RIGHT or ONE FINGER SCAN to locate the Write Post button. With focus on that object DOUBLE TAP to activate it.
  4. Focus will move to the "What's on your mind?" text field and the on-screen keyboard will appear. From there type in your update or dictate it using the funky dictation tool available through the on-screen keyboard.
  5. When you are happy with your message, SWIPE LEFT to go back to the Post button and activate this with a DOUBLE TAP. Your message is now posted to your timeline.

Tuesday 18 November 2014

Understanding Cell Comments - Excel 2007 - JAWS V15

Working with Cell Comments in Excel

In this post I'd like to introduce you to one of my favourite Excel features: cell comments. I've always regarded their use as an essential way of making a workbook, not only more accessible, but hugely more understandable.

Comments also have a great synergy with JAWS - you can have all of this extra helpful information without upsetting the flow of information in the worksheet itself. Sometimes, when a spreadsheet creator is trying to create more understanding, the temptation is to type any guidance directly into the cells. But doing this can make navigating data areas a more messy, tediously slow and verbose exercise. Instead of assisting someone make better sense of the data, loads of explanatory text situated in cells can disrupt the flow and make the worksheet even more confusing.

What is a Cell Comment?

Physically, a comment in Excel is a small edit area you can open - potentially one window for each cell - and type a message in. This comment edit window can then be collapsed and essentially disappears. However, the cell will "have comment" and this is physically indicated by a tiny red triangle in the top right hand corner of the cell.

Actually, a neat way to think about Excel comments is to think of them as a kind of "Post It" style note that you can attach to any cell. Stick one in a cell to remind you to do something or to supply some extra details for some additional insight.

Before we walk through comments in our worksheet though let's create a small table of data to work with. I am going to create the following data in Excel (I have included the cell references in brackets as a guide) but please feel free to improvise:

First Quarter Sales (A1)Bought (B1)Sold (C1)
Cars (A2)150 (B2) 125 (C2)
Ships (A3) 50 (B3) 40 (C3)
Trains (A4) 225 (B4)200 (C4)

Even from this small and basic table of data there are some likely targets for cell comments. For example, region title in cell A1 is ripe for a cell comment, perhaps further explaining the data itself, setting the scene, providing some to and from dates, any particular trends through the period and so on. The row headings too might benefit from cell comments, perhaps to add a bit more insight on what cars/ships/trains exactly and why. Additionally, some of the data cells might benefit, especially if some of the data is unconfirmed for example. So, as even these initial examples indicate, there is potentially a lot more hand-holding information that can be supplied and that is exactly where comments step right in!

Inserting and Reading a Cell Comment

I am going to start by putting a comment in cell A1 to accompany the title:

  1. Navigate to cell A1. (Note that in Excel you can use the Go To A Cell keystroke of CONTROL G, type in the cell you need to go to and press ENTER to go there.)
  2. With focus in cell A1, call up the applications (context) menu for the cell using the RIGHT HAND WINDOWS key or SHIFT F10 instead.
  3. ARROW UP or DOWN to the Insert Comment option and press ENTER.
  4. Focus will now move to the small comment edit window. Type in your comment as required and, when you have finished, press the ESCAPE key to move out of the comment and close it down. (Don't worry - in this case using ESCAPE will still result in your comment being saved.)
  5. Move away from the cell and back again - notice how JAWS echoes "cell has comment".
  6. Read the comment in the current cell using the JAWS keystroke of ALT SHIFT APOSTROPHE.

Editing and Deleting a Cell Comment

From time to time you may have to edit the existing cell comments and you will certainly have to delete comments too, this is how you do it:

Edit a Cell Comment

  1. Navigate to the cell containing the comment.
  2. Access the applications or context menu for the cell.
  3. Choose the Edit Comment option in the menu and press ENTER.
  4. Focus will move into the existing comment window. Adjust the text in the standard way and tap the ESCAPE key to confirm the changes and return to the worksheet area.

Delete a Cell Comment Entirely

  1. Navigate to the cell containing the comment you want to delete.
  2. Access the applications or context menu for the cell.
  3. Choose the Delete Comment option in the menu and press ENTER.
  4. Focus will return to the worksheet area - check that your comment has been deleted from the cell.

Welcome to the simple yet wonderful world of comments in Excel! Now let's cover a few of the extra bits in JAWS that really help to make cell comments such a helpful feature.

Additional JAWS Tricks

I mentioned earlier that JAWS dovetails very well with the cell comments feature. So, here are a couple of extra keystrokes to add in to the Excel cell comments mix:

How Many Comments?

When you have to explore a new worksheet, use the JAWS context Help system for information on how many comments exist:

  1. With focus in the appropriate worksheet, launch the JAWS context help system with INSERT F1.
  2. Allow the virtual cursor to speak or press the DOWN ARROW to move line by line in the Help window. Listen for the information "The worksheet contains X cells with comments".

List Cells with Comments

When you have established that the worksheet does contain a number of comments, you might find it useful to have a bit more information on each of them and even move to some of those cells directly. This is how:

  1. With the relevant worksheet in focus, press the JAWS keystroke of CONTROL SHIFT APOSTROPHE.
  2. Focus will move to a JAWS list box containing a list of all of the cell comments in the current worksheet. Notice that the cell reference and the comment is supplied.
  3. Move through the list information in the standard way with the UP and DOWN ARROW keys.
  4. To move to one of the cells with a comment, press the ENTER key on the relevant list item. The list box will close and focus will move to that cell in your worksheet.

And there we are! I hope I've managed to communicate just how sleek it is to introduce comments into your work in Excel. Not only can they help from an accessibility and ease of use perspective but they can be used to store considerably more context information for your data - without the verbosity overhead that you get when text is input directly into cells. Cell comments: know them, love them. Have fun!

Looking for more information on the JAWS screenreader? Then please visit:

www.freedomscientific.com

Monday 17 November 2014

Email Templates - Outlook 2007 - Keyboard

Creating an Email Form in Outlook 2007

Do you ever have to send emails containing pretty much the same content from time to time? If this is the case, you're probably used to going to Sent Items, opening the last relevant email, then amending it before you send it on to a new recipient. However, there is another way - you can create a suitable email template and store it in your Personal Forms Library. This is how you make it happen in Outlook 2007:

The Developer Tab

The Developer tab is an optional ribbon tab that contains a number of useful features, one of which - "publish form as" - you will need to access in this walkthrough. So, the first thing we need to do is check that you have your Developer Tab displayed in the ribbon:

  1. Create a new email message with CONTROL N (from your Inbox) or CONTROL SHIFT M (from anywhere).
  2. Tap the ALT key to move to the upper ribbon associated with the new message.
  3. With focus on the Message Tab, press the LEFT ARROW to move to the Office button. Press the SPACEBAR.
  4. In the Office button dialog box (containing the New, Open, Save options etc) press ALT I to open the Editor Options dialog box.
  5. Focus will be on an option called Popular in a list of other categories. Ensure that Popular is indeed in focus then press TAB to move to the Working with Outlook settings.
  6. Press the TAB key until you have focus on the Show Developer Tab in the Ribbon checkbox. Tick this checkbox using the SPACEBAR.
  7. With the Show Developer Tab checkbox checked, press TAB to move around to the OK button and press the SPACEBAR to confirm.
  8. Return to your document and move back to the upper ribbon. ARROW RIGHT along the upper ribbon and check that the Developer tab is present. If it is, you're ready to move on to the next part.

Now that you have the Developer Tab present in your ribbon you'll have access to the Publish option. So, let's go through creating an email template, storing it and accessing it via your Personal Forms Library:

Create an Email Form

  1. Create a new message with CONTROL N or CONTROL SHIFT M.
  2. Type in any recipient details in the To: field and input a typical subject line as necessary.
  3. Type in all of the standard data (the stuff that needs to stay the same from message to message) as necessary. For example, you might need to include standard text such as:
    • Contact Information
    • Instructions
    • Disclaimers
    • Form Labels (Title, Address, Telephone etc)
  4. After you have input your required text - and you have checked that it is laid out exactly as required - press ALT to move to the upper ribbon.
  5. Move to the Developer Tab and press the DOWN ARROW to move to the lower ribbon.
  6. Use the TAB key to move through the lower ribbon and focus on the Publish drop down button. Press SPACEBAR.
  7. In the Publish drop down menu, highlight the Publish Form As option and press the ENTER key.
  8. In the Publish dialog box, press the TAB key or use ALT L to move to the Look In combo box. Check that this is set to Personal Forms Library and press TAB to move back to the Display Name field.
  9. In the Display Name field type in an appropriate name for your email message template.
  10. Press TAB to move to the Publish button and press SPACEBAR to save.

Access the Message Form

With your form stored in the Personal Forms Library you can access it quickly and easily when required:

  1. From your Inbox, move to the Menu Bar in Outlook 2007 with the ALT key.
  2. Navigate to the Tools menu using the RIGHT ARROW key.
  3. Open the Tools menu using the ENTER or DOWN ARROW key. Move down through the options in Tools and locate the Forms submenu.
  4. Access the Forms submenu with the ENTER or RIGHT ARROW key. Highlight the Choose Form... option and press the ENTER key.
  5. The Choose Form dialog box will now take focus, press ALT L to move to the Look In combo box. Set this to Personal Forms Library if it isn't already then TAB to the list of files stored there.
  6. Browse the list of files and press ENTER on the specific file you need. This form will now open and take focus.
  7. Fill in the additional details required to complete the email message and send it in the usual way.

Now, instead of copying and pasting or resending an already sent email or keeping body text in a separate document, you can set up a range of Outlook templates and load them in when you need to. Have fun!

Tuesday 11 November 2014

Setting Column and Row Headings in Excel 2007 with NVDA V2014.3

Setting and Reading Excel Column and Row Headings with NVDA

One of the most important echo features when you are working in Excel is the ability to have column and row information spoken as you move through data. This translates to the following behaviour:

  • Moving up and down data in the current column, the screenreader reads cell data and the corresponding row heading.
  • Moving left and right through data in the current row, the screenreader reads the cell data and the corresponding column heading.

The bottom line is that you need to have some contextual information echoed for the data you are moving through. When you don't have this option, the whole process of making sense of the worksheet becomes a nightmarish mish-mash of moving backwards and forwards to continually check and re-check information. Horrible!

So, let's demonstrate this title-reading feature in NVDA and Excel 2007:

Setting Column and Row Headings in NVDA

  1. Open MS Excel and focus in cell A1, type in the word "Sales" and press the ENTER key to leave the edit mode. Tap the UP ARROW to move to cell A1 and confirm the edit with speech.
  2. Press the RIGHT ARROW to move to cell B1 and type a heading, "January" for example.
  3. Press RIGHT ARROW again to move to cell C1 and type another heading, "February" for example.
  4. Press RIGHT ARROW again to move to cell D1 and type another heading, "March" for example.
  5. Using the LEFT ARROW, move back along the cells in row 1 until you have focus in cell A1. Press the DOWN ARROW to move to cell A2 and type in the first row heading, for example "Cars".
  6. Staying in row 2, use the RIGHT ARROW key to move to the next cell (B2) and type in a number. This will be my sales figure for cars in January.
  7. Another press of the RIGHT ARROW moves the focus to the adjacent cell in the row, C2. As before, type in another number, this will be the car sales figure for February.
  8. Move right again and focus will be in cell D2. Type another number and this will be the car sales figure for March.
  9. With all the values in row 2 complete move back along to column A with the LEFT ARROW. Now press the DOWN ARROW to move to cell A3.
  10. Using the same approach as in the previous steps, complete several other rows of figures - don't go overboard, just another few rows of data to give you something more to work with. (In my example here I have chosen types of transport as my row headings but feel free to choose whatever you wish.)

My test data is now complete, I have several rows of figures each sitting with a row heading (my row headings are Cars, Bikes, Ships and Trains) and a column heading (January, February and March). So, I can check what the sales figure for a transport type is for any particular month simply by going to the appropriate cell. However, even in a small table of data like this, the feedback is not that helpful - I don't have the important heading information to build that meaningful context around the numbers.

This is exactly where heading reading comes in. Any screenreader worth its salt will allow you to "remember" the row and column that has your heading information in it. By doing this, the screenreader can then automatically echo that information back as you physically navigate through the data. That way, instead of just numbers being spoken, the extra feedback lets you build up a fuller picture of the information.

Let's give it a bash:

  1. Starting with columns first, locate the first cell that contains a column heading - in my case cell B1. With focus on that first column heading cell, use the NVDA keystroke of: INSERT SHIFT C. This will set the reading of the column heading information to the current row.
  2. Now, reposition the cursor by moving to the first cell that contains a row heading - which, in my example, is A2. With focus on that cell, use the NVDA keystroke of: INSERT SHIFT R.
  3. With both of these settings completed, now drift through your data. Notice that NVDA now speaks the data and the relevant column or row heading.

This column and row heading ability is one of those features that, after you start using it, you'll never ever want to be reading worksheet information without it - it really is that good.

I'll be returning to this feature in a later post, but for now get Excel out and have a play with NVDA.

For more information on NVDA please visit:

www.nvaccess.org

Accessible Information - MS Word 2007 - Best Practice

Making Information Accessible: Tips for MS Word

In this post I want to share with you a few thoughts on document accessibility, to point out some of the things to be mindful of when you are working in MS Word.

Inclusion is all about asking questions. So, I hope that this little table of information pointers can encourage you to think about creating more flexible content. The aim of this table is to highlight some of the main areas, both broad and specific, that may require more careful consideration and discussion.

This list is my own selection, one that I have topped and tailed over time, so I don't claim it to be in any way exhaustive. But, if it can give you a bit of a steer in some areas and help you to form and ask some of those inclusion questions - even if it is just for you - then it's done its job.

I put the list in table format and it is a living document so I'll come back here every now and again and update it:

Feature/Function

Implication

Notes/Technique

Autocorrect

·        Special characters may be inserted automatically in your typing. For example, the fraction 1/2 (3 characters) may be reformatted to a 1 character version.
·        Check all your auto correct and auto format settings in MS Word - be aware of these automatic changes and the impact they may have (Braille output for example).
Bookmarks
·        The use of bookmarks is not always apparent to a reader.
·        Using the Bookmarks option carries an assumption of ability.
·        Readers need to be aware this feature is active and that the document has a range of bookmarks.
·        Ensure that created bookmarks have proper descriptions.
·        With long documents, ensure that ease of navigation is not solely reliant on a single approach.
Character set
·        Only ASCII and ANSI character sets are fully verbalised by screen readers
·        Type all text directly from keyboard. You can test this by pasting any text into a text editor such as Notepad. Characters that turn into squares are not ASCII or ANSI.
Colour
·        Coloured text may conflict with high contrast or per user custom colour interface settings. For example, setting text to black in high contrast themes will result in black text on a black background.
·        Avoid setting specific colours for text if at all possible. Leave the default setting of Automatic active.
Comments
·        Screen reader users are not automatically informed when this feature is active.
·        Using the Comments option exclusively carries an assumption of ability.
·        Readers need to be made aware that the Comments feature is active.
·        Where possible, allow for a choice of different routes for feedback. Always aim to remove any dependency on one method.
Exporting
·        Certain export formats may be more natively accessible than others. For example, Word documents "printed" to PDF will result in a graphic only PDF and will not be accessible.
·        Consult appropriate sources for guidance on output formats. For example, with a PDF use the extra Save options to ensure a more natively accessible file.
Fonts
·        Certain font types may be difficult to read for some users.
·        Some fonts perform poorly when magnified.
·        Ensure all text created complies with any established or internal standard. For example, RNIB clear print is set at Arial 14 point regular style.
Footnotes
·        Screen reader users may not be automatically informed/aware when this feature is active
·        Make readers aware that the document contains footnotes.
Forms
·        Form controls such as "combo boxes" and "checkboxes" embedded in a Word document may be inaccessible to a screen reader.
·        Labels for such controls may not be programmatically associated with them.
·        Labels and controls may be positioned awkwardly. For example, a label at the left margin with the corresponding control over at the right margin.
·        Some AT may not work with these kinds of forms at all.
·        Consider an alternative method for gathering the data, such as an accessible web form or accessible PDF form.
·        If the results must be in MS Word, consider alternative non-form control methods of gathering the data.
Headers and footers
·        Text typed into headers or footers is not automatically read by screen readers.
·        Header and footer text and styling may impact on readability.
·        All important information to be read should reside in the main body of the document. Do not use the header and footer areas for important text.
Heading Styles/Paragraph Styles

·        Without heading styles, documents lack a hierarchy and a formal structure.
·        From a speech point of view, documents without useful heading styles are considerably slower to navigate.
·        Ensure that meaningful paragraph styles are followed and adopted.
·        Embed styles in the existing Normal.dotm template in MS Word.
Images
·        Content in images is not accessible to screen readers.
·        The image object itself may even be skipped and thus be "invisible" to a screenreader user.
·        Poor quality images will be even worse when magnified.
·        Specific types and styles of image may be visually confusing, especially when magnified.
·        Colours present in images may be difficult for some viewers/readers - images will not inherit custom colour settings.
·        Add ALT text and/or a Caption to describe image contents.
·        Never use images solely to convey information.
·        Images should be set in the text layer of the document (eg. occupying their own paragraph with no wrapping text)
·        Ensure that images used are high quality and purposeful - without extremes of contrast.
·        Use images sparingly/only when absolutely necessary.
·        Ensure that all relevant images have equivalent informative text
Paste
·        The ordinary Paste function will carry over content AND formatting (which is not always obvious). For example, when copying from a web page.
·        Use the Paste Special option and choose Unformatted Text. Doing this pastes the content only.
Save As…
·        Meaningless or coded filenames make finding/locating documents difficult.
·        Saving into a different format (e.g. PDF) may change the level of accessibility.
·        Keep filenames descriptive, consistent and concise.
·        For any series of documents with long and similar names, aim to have the changing letters or numbers at the beginning of the name - not the end.
·        Ensure that you are fully aware of the accessibility level of any saved non-native formats.
Tab Table Layouts
·        Tab spacing can be tricky to navigate via the keyboard and the screenreader echo may not be meaningful.
·        Tabbed areas can be adversely affected by incorrect keyboard navigation.
·        Tabbed areas rely on white space for visual sense and may be confusing when magnified.
·        Avoid tab tables if possible. Create formal uniform tables using the appropriate Table tools.
Tables
·        Tables created using spaces and tabs are not easily accessed/navigated.
·        Merged cells can disrupt logical reading order for screenreader users.
·        Don’t use cell borders to convey important information - unless this information is also conveyed in the body text. 
·        Use Table menu, Insert or toolbar icon to create a table
·        Organise data so merging cells is not necessary
·        Break down data sets into separate tables if required
·        Locate the table heading above the table grid itself and format as a left aligned heading level
Text boxes (not Borders)
·        Text boxes behave like walls around text in the page and may be inaccessible to screenreader users.
·        Text boxes in a page may negatively impact on a keyboard users ability to navigate.
·        Avoid text boxes and consider an alternative method of presenting your information.
·        If you still need a box guide, test a border around the text.
Track Changes

·        Screen reader users may be unaware that Track Changes is active.
·        Usage of this facility relies on an assumption of ability in the reader.
·        The Track Changes feature can be unpredictable when used across different versions of MS Word (2003/2007/2010 etc)
·        Include a note at the start of the document (or with any accompanying information) to inform users that the tracked changes feature is active.
·        Where possible, consider multiple alternative strategies for gathering comments and feedback.

Friday 7 November 2014

Quick Access Toolbar - Office 2007 - NVDA

Customising the Quick Access Toolbar in Office 2007

For those of you still using Office 2007, the Quick Access Toolbar (or "QAT") has the dubious distinction of being the only customisable part of the Office 2007 ribbon interface. It really wasn't until Office 2010 that more options, principally the extensive ribbon customisation, became a welcome reality. The QAT then is a vitally important piece of making your Office 2007 experience a more positive one, allowing you to find features in MS Word and Excel in a less tedious fashion.

In this post I'm going to revisit the QAT, specifically from an Office 2007 perspective. I'll be covering what it is, how you navigate it and, most importantly, how you can make it work for you.

What is The Quick Access Toolbar?

Back in earlier versions of Office the main interface comprised of a Menu Bar (File, Edit, View etc) with a variable number of Toolbars (Standard, Formatting, Drawing etc). All of these areas were pretty configurable, you could even create your own empty toolbar and fill it with whatever features and functions you required. Those days are seemingly dim and distant but the Quick Access Toolbar has singlehandedly carried such once cherished traditions on and into the "ribbonised" versions of Office 2007 and above. Essentially, the QAT is a new take on that old style of custom toolbar.

What can I use the QAT for?

I advise new learners to use the QAT to store the following:

  • Functions/features located across different tabs that you tend to forget or just find too tedious to navigate to manually.
  • Functions/features that do not have easy or memorable direct keystrokes.
  • Functions/features such as your own macros or other options and settings not displayed within the default tab structure.

How do I navigate to the QAT?

This image shows the area of the ribbon referred to as the Quick Access Toolbar. here it is showing it's default view with the basic Save, Undo and Redo commands in it.

By default in Office 2007, the QAT is located directly above the Home tab and to the right of the infamous Office button. Physically, it is a small horizontal toolbar row that occupies the same line as the Title Bar of the active window. Using basic keystrokes you can focus on the QAT quite easily:

  1. Tap the ALT key to move to the Upper Ribbon area.
  2. Ensure that you have focus on the Home ribbon tab and use the keystroke of SHIFT TAB. (You can also press UP ARROW but the advantage of using SHIFT TAB is that it grounds your focus on the same item, in the same location, every time. This customise menu button option is located at the right hand edge of the QAT - note that regardless of how many items you add to the QAT, nothing will ever be placed to the right of this. If you do ARROW RIGHT away from this menu button then focus will skip off the edge of the QAT.
  3. From this Customise menu button, move back along the already present icons in the QAT using the LEFT ARROW. In Office 2007, if you ARROW LEFT and hear the Office button option then you have skipped off the left edge of the QAT. If this happens, tap the RIGHT ARROW to move back to the Home ribbon tab then use SHIFT TAB again to refocus on the Customise Toolbar button.
  4. To activate any of the command icons in the QAT, focus on the appropriate command button and press SPACEBAR to activate it.

By default, if you haven't already explored and experimented in this area, the QAT will probably have a bunch of basic commands in it, for example: Save, Undo and Redo. But remember what I said earlier about not taking up slots in the QAT for things that are pretty basic and have direct keystrokes anyway? Well, the default functions there are a great example of this! What is the point of taking up room in the QAT when each of those features already has a direct keystroke? With this in mind, our first job then is to tailor your toolbar to make it more meaningful for you.

Removing Commands in the QAT Directly

The quick access toolbar is all about being able to do Office 2007 stuff quickly, once it is set up properly of course. Thankfully, removing unwanted features in the QAT is very simple:

  1. Move to the quick access toolbar via the upper ribbon.
  2. Focus on the particular command icon in the toolbar you wish to remove.
  3. Call up the context menu for the command in focus with the APPLICATIONS MENU key or SHIFT F10 - if you're a bit more old school like me LOL.
  4. In the small context menu, choose the Remove From Quick Access Toolbar option and confirm with ENTER.
  5. The focused command will now be removed (permanently I might add) from the currently displayed quick access toolbar. Focus will then return to your active document.

Note that this isn't the only way to remove commands that appear in the QAT, you can also do some wholesale spring-cleaning from the Customise dialog box and we'll be looking at this area a bit later but first, now that we have removed commands directly let's cover adding them.

Adding a Command to the QAT Directly

This context menu approach outlined in the previous walkthrough can also be used to add commands to the QAT. This is how it is done:

  1. Press the ALT key to move to the upper ribbon.
  2. Use the LEFT and RIGHT ARROW keys as necessary to locate the relevant tab. Press the DOWN ARROW to move to the associated lower ribbon.
  3. Use the TAB key to manually move through the groups of commands in the lower ribbon and locate the feature or function you require.
  4. Call up the context or application menu for the command using the APPLICATIONS MENU key or SHIFT F10.
  5. In the context menu, choose the first option: Add to Quick Access Toolbar. Press the ENTER key to confirm the operation.
  6. Focus will return to your current document and the command you specified will now have a shortcut in your quick access toolbar.

The great thing about the above two approaches for adding and removing options is that it allows you to manage your quick access toolbar while avoiding the greater complexity of the main Customise the QAT dialog box. However, to have greater choice and control control over what is displayed, this is the place to go. So, let's head over there and see what the deal is!

Launching the Main Customise Dialog Box

There are two ways to launch the Customise the QAT dialog box, I'll go through them both:

    Route 1:

  1. Press ALT to go to the upper ribbon.
  2. Press SHIFT TAB to go to the Customise menu button. Press the SPACEBAR to activate the menu.
  3. Press the UP ARROW to move to the More Commands... option and press ENTER to confirm. (Note: On your way towards the More Commands... option you'll pass many of the basic functions you can choose from in this menu. Basic options are included such as Save, New and Open - but we really don't want any of them as they can all be triggered by direct keystrokes such as CONTROL S for Save and CONTROL Z for Undo and so on.)
  4. Focus will move to the main Customise the QAT dialog box and you will be in a list of categories. Initially, if this dialog box is completely new to you, I always suggest using the TAB key to move around all of the options to get a feel for what is available.
  5. Route 2:

  6. Press ALT to go to the upper ribbon.
  7. Open the context menu with the APPLICATIONS KEY or SHIFT F10 and select the Customise the Quick Access Toolbar... option. Press ENTER to confirm. Note: I should mention here that if you are taking Route 2 in Office 2010 or above then you will also find the customise the ribbon options in this context menu too. So, you have the options for customising the QAT and the ribbon itself - that's what makes Office 2010 a bit funkier.

Whatever method you use to launch the main customise dialog box, when focus moves there make sure you use the TAB key to explore all of the options.

Using the Customise the QAT Dialog Box

While the main dialog box seems pretty daunting at first, if you keep circling around it it should start to make some sense - let's run through the main options that we're concerned with here. (By the way, I'm using NVDA at this point so how I describe the controls in this dialog box is heavily influenced by my screenreader feedback. Anyway, the main options to pay attention to are:

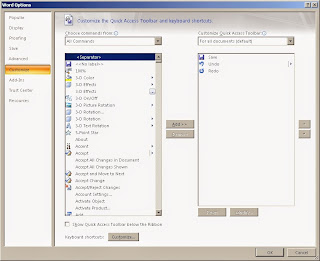
  • Choose Commands From combo box: Normally this is set to Popular Commands by default, what you set in this combo determines the content displayed in the command listbox you'll be tabbing to next.
  • Unlabelled list box: If the commands combo box is set to popular commands then you should find the top item in the list (Separator) is spoken. This list - the first of two in this dialog box - contains all of the options determined by the category chosen in the previous Choose Commands combo box. In other words, you choose the commands in this list before you "add" them to your QAT.
  • Add and Remove buttons: These button controls have been assigned the direct keystrokes of ALT A and ALT R. Use these buttons to confirm the adding of a highlighted command in the first list or the removal of a command in the second QAT list.
  • Customise Quick Access Toolbar combo box: This control determines whether you are making changes to the Quick Access Toolbar on a global or individual document basis. Generally, unless you have a specific need to, the default of "For All Documents" is fine - which means that any changes you make in the QAT will always be available and not just when you are in a specific document.
  • Quick Access Toolbar list: The second of the two main lists in this dialog box, this one shows, in order, the commands you already have in your QAT. When you add a command from the first list it will appear in this second list. The list is arranged so that the command at the top of this list will be the leftmost command in the toolbar itself. The command at the bottom of this second list will be the one on the extreme right edge of the QAT.
  • Move Down and Move Up buttons: These options give you the flexibility to move items in the second list up or down. By doing this, each command is moved left and right in the QAT.
  • Show Quick Access Toolbar Below the Ribbon checkbox: Toggle this checkbox on and off with the SPACEBAR. By default the QAT is situated above the Upper Ribbon - which is why you are pressing ALT then using SHIFT TAB. You can set the ribbon to appear beneath the ribbon although, if you are using the keyboard it can be a bit of a faff to navigate there. I tend to advise that if you are a keyboard user keep the QAT above the ribbon (it's easier to navigate to) although if you are a magnification and mouse user you might want to set the QAT location beneath the ribbon. The latter is because, being set closer to the document working area, it's quicker to get there using the mouse.
This image shows the main Customise the Quick Access Toolbar dialog box.

Now that you have a bit more of an idea on some of the main options, let's run through an example of adding and removing a few commands. In this example, I'm going to add a couple of table-related commands then remove some of the basic things still in my QAT such as Save and Undo. Both of these functions have been sitting in my toolbar for too long doing diddly squat - okay, let's roll:

  1. Navigate to the Customise the Quick Access Toolbar dialog box using whatever method you find most convenient.
  2. Press TAB to move to the Choose Commands combo box and set it to All Commands, confirm with the ENTER key. TAB to the main command list which will now show all of the commands in MS Word - yes, it's a big list.
  3. In the unlabelled list of commands, use first letter navigation to move to the options beginning with "I" and then press DOWN ARROW (or continue to tap the "I" key) to move to an option labelled Insert Table. Problem is: there's two of them with the same name! The one I want here is the second one, located just above the option called Insert Table of Authorities.
  4. With the correct Insert Table option in the list highlighted, TAB to the Add button and press the SPACEBAR. Doing this now adds the highlighted "Insert Table..." command to the Quick Access Toolbar list.
  5. SHIFT TAB back to the command list and this time we're going to add the convert table to text command. So, as before, tap the letter "C" to move through the commands beginning with that letter.
  6. With the correct Convert Table to Textoption highlighted, TAB to the Add button and press SPACEBAR to confirm as before.
  7. At this point it's good form to check the QAT list out and maybe reorder some of the commands in there and also remove any that don't serve a purpose any longer. With this in mind, press TAB until you have focus in the second QAT list.
  8. Use your UP and DOWN ARROW keys to check out the commands in the QAT list. I've noticed a couple of commands (in my case, Save and Undo) that I want to get rid of. So, highlight the relevant command in the QAT list, then either SHIFT TAB back to the Remove button and press SPACEBAR or use the hotkey ALT R to remove the command directly.
  9. After some trimming the QAT now only contains my new table commands, which is great. If I want I can now re-order my list by highlighting the command I want to move then pressing the TAB key to go to the Move Up or Move Down buttons. With focus on either of those I can press the SPACEBAR to move the highlighted command up or down as necessary. In this case though I'm pretty happy with things as they are - I don't have stacks of commands in there to make reordering everything necessary.
  10. When all the adjustments are finished, TAB to the OK button and press the SPACEBAR. Your new customised Quick Access Toolbar is good to go!

Activating the Commands in the QAT

There are two ways to approach using commands in the QAT, you can:

  • Navigate to the Quick Access Toolbar and move through the commands with the LEFT and RIGHT ARROW keys. Use the SPACEBAR to activate the command in focus.
  • Or...

  • Use the magic keystrokes - did you know that every command you put in the QAT is assigned a direct keystroke? The first command in the toolbar is set to ALT 1, the second command is set to ALT 2 and the third is ALT 3 and so on. Intriguingly, the keystroke for the 19th command in the QAT is ALT 0A (press ALT then tap 0 then A) the twentieth is the equally obscure but still handy ALT 0 B and so on. Yes, I know, a bit weird if you plan on having loads of stuff in your QAT but... they work so - thank you Microsoft LOL
This image shows the Quick Access Toolbar keytips, highlighting how each command in the QAT is assigned an individual keystroke.

Summary

Okay, I hope that this post has given you the incentive to explore this whole quick access toolbar area, regardless of whatever Officer version you are rocking. When you get your QAT set up properly, especially in Office 2007 where you can't customise the ribbon, there's the potential to save a bucketload of time. Now then... what to add to the QAT...any ideas...?

Have fun!

For more information on NVDA please visit:

www.nvaccess.org